Mastering Use of a Wood Float for Concrete Work: Guide
A wood float is an invaluable tool in the world of concrete work, renowned for its versatility and efficiency. With a simple yet effective design, this humble hand tool has been a mainstay in construction for decades. Though commonly associated with creating smooth surfaces, a wood float has a wide array of applications that go beyond traditional finishing. In this article, we will explore the diverse uses of a wood float in concrete work, showcasing how this unassuming tool can contribute to the success of various projects. We will also provide a step-by-step guide on how to use a wood float effectively and efficiently.
If you need help finding a wood float for any of the versatile applications listed below, check out our product review here.
Unlocking the Versatility: The Many Applications of a Wood Float for Concrete Work
Surface Smoothing and Leveling
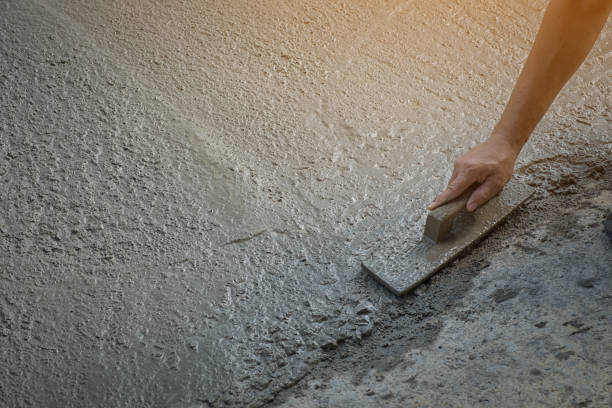
The primary application of a wood float is, of course, to achieve a smooth and level surface on freshly poured concrete. After the initial screeding process, a wood float is employed to work the surface, removing excess water and filling voids. The coarse texture of the wood blade helps to work the concrete efficiently, producing an even and polished finish. Whether it’s a sidewalk, driveway, or patio, the wood float is indispensable for creating aesthetically pleasing and functional surfaces.
Texturing and Pattern Creation
Beyond smooth finishes, a wood float can be utilized to create textured surfaces and unique patterns in concrete. By manipulating the float in different directions or applying varying pressure, craftsmen can leave distinctive marks, swirls, or trowel patterns on the concrete. This artistic touch adds character and visual interest to sidewalks, plazas, or decorative concrete elements.
Edging and Detailing
A wood float’s versatility shines when it comes to edging and detailing work. It excels at creating crisp edges along walkways or curbs, ensuring clean lines and professional-looking borders. The precision offered by the wood float enables contractors to achieve intricate designs and smooth transitions in tight spaces or corners.
Repair and Patching
Wood floats are also essential for repairing and patching concrete surfaces. When addressing small imperfections or holes in existing concrete, a wood float can blend new material seamlessly with the old, ensuring a consistent appearance.
Exposing Aggregate
In exposed aggregate concrete finishes, a wood float plays a crucial role in the finishing process. After the initial pour, the surface is worked with a wood float, removing the top layer of cement paste to reveal the aggregate beneath. The result is a stunning, textured surface that showcases the natural beauty of the stones.
Preparing for Sealing or Coating
Before applying concrete sealers or coatings, using a wood float to achieve a smooth, uniform surface is essential. By eliminating imperfections and creating a clean canvas, the concrete is better prepared to receive sealants or coatings, ensuring enhanced durability and longevity.
Conclusion
The wood float is far more than a tool for achieving smooth concrete surfaces. Its applications span from basic surface finishing to intricate detailing, allowing contractors and artisans to unleash their creativity in concrete work. From smoothing and leveling to creating textures and patterns, a wood float is an indispensable companion in any concrete project. Its simple yet versatile design continues to make it a cherished tool among professionals and DIY enthusiasts alike, enriching the world of concrete work with every skilled stroke.
Step-By-Step Guide on How to Use a Wood Float Effectively for your Desired Finish
Using a wood float for concrete work requires proper technique and attention to detail to achieve a smooth and polished finish. Follow these step-by-step instructions to make the most of this versatile hand tool:
Step 1: Prepare the Concrete Surface
Ensure that the freshly poured concrete is properly leveled and screeded. The concrete should be at a stage where it can support the weight of a person without sinking or becoming too stiff.
Step 2: Select the Right Wood Float
Choose a wood float that suits the size of the project and the desired finish. Larger floats cover more surface area quickly, while smaller ones are ideal for detailed work and touch-ups.
Step 3: Wet the Wood Float
Before using the wood float, moisten it with water. This prevents the concrete from sticking to the float’s surface and allows for smoother maneuvering.
Step 4: Begin Floating
Start floating the concrete by holding the wood float at a slight angle. Begin at one end of the concrete surface and work your way towards the other end.
Step 5: Apply Even Pressure
As you move the wood float across the concrete, apply even pressure to the surface. This helps consolidate the concrete and fill any voids or imperfections.
Step 6: Work in Sections
Divide the concrete surface into manageable sections, working on one area at a time. Overlapping strokes will ensure an even and consistent finish.
Step 7: Use a Crosshatch Pattern
After floating the surface in one direction, change the angle of the wood float and float the concrete again in a perpendicular direction. This crosshatch pattern further levels the concrete and helps achieve a uniform finish.
Step 8: Address Imperfections
If you notice any low spots, voids, or bumps during the floating process, use the wood float to address these imperfections. Gently fill low spots with additional concrete or level out bumps with the float.
Step 9: Create Desired Texture (Optional)
If you want to create a textured surface, manipulate the wood float in various directions or apply different amounts of pressure. Experiment with different techniques to achieve the desired effect.
Step 10: Finishing Touches
Once you have floated the entire surface, inspect it for any remaining imperfections. Touch up any areas that require attention, ensuring a smooth and professional finish.
Step 11: Let It Cure
Allow the concrete to cure as per the manufacturer’s instructions before proceeding with additional treatments or sealers.
Step 12: Clean and Maintain the Wood Float
After use, clean the wood float thoroughly with water and a brush to remove any concrete residue. Store the wood float in a dry place to preserve its effectiveness and extend its lifespan.
By following these steps and practicing proper technique, you can master the use of a wood float for concrete work, achieving impeccable finishes and professional results in your projects.
Frequently Asked Questions
Can you over float concrete?
Yes, it is possible to over float concrete, and doing so can have negative consequences on the final finish and overall performance of the concrete. Over floating refers to excessive or prolonged use of a float on the concrete surface, beyond what is necessary to achieve the desired finish.
Here are some potential issues that can arise from over floating concrete:
- Surface Over-Smoothing: Over floating can result in an excessively smooth surface, which may be counterproductive in certain applications. For example, in exterior applications or areas where slip resistance is essential, an overly smooth surface can become slippery when wet, posing safety risks.
- Sealing Challenges: An excessively smooth surface may have difficulty bonding with concrete sealers or coatings. These materials may struggle to adhere effectively to the concrete, leading to reduced durability and premature wear.
- Weakening the Surface: Excessive floating can cause an overabundance of cement paste to rise to the surface. This can weaken the top layer of the concrete, making it more susceptible to abrasion, scaling, and other surface-related issues.
- Surface Trowel Marks: Over floating can leave undesirable trowel marks on the concrete surface. These marks may not be fully eliminated during finishing and may become more pronounced as the concrete cures.
To avoid over floating, it’s essential to know when to stop the floating process. The optimal time to stop floating depends on factors such as the type of concrete mix, weather conditions, and the specific finish you want to achieve. Typically, as the concrete starts to set and lose its excess water, it becomes less workable with the float. When the float no longer leaves deep indentations or is causing excessive paste to rise, it’s time to move on to the next finishing steps.
Remember that achieving a smooth and polished surface is essential, but moderation and proper timing are equally crucial. Understanding the behavior of the concrete mix and being attentive to the floating process will help you strike the right balance and achieve a high-quality finish in your concrete work.
What are some tips to not over float concrete when using a wood float?
To avoid over floating concrete when using a wood float, follow these tips and best practices:
- Timing is Key: Know the right time to start floating the concrete. Wait until the concrete has stiffened enough to support the weight of a person without sinking excessively. Typically, this is when the concrete has set to the point where a footprint is no longer visible.
- Start with the Basics: Begin with a few initial passes of the wood float to consolidate and level the surface. Avoid excessive pressure during these initial passes to prevent overworking the concrete.
- Observe Surface Behavior: Pay close attention to the behavior of the concrete surface as you float. If the float leaves deep indentations or causes an excess of paste to rise to the surface, it may be too early to continue floating.
- Limit Floating Time: Limit the total floating time to a reasonable duration. For most concrete mixes, continuous floating for more than 10-15 minutes is generally not recommended.
- Crosshatch Technique: When floating, use the crosshatch technique, which involves changing the direction of the float in a perpendicular pattern. This technique helps achieve a uniform finish without the need for excessive passes.
- Work in Sections: Divide the concrete surface into manageable sections and float one area at a time. This approach ensures that you can focus on each section without overworking the entire surface.
- Avoid Overlapping Passes: When floating adjacent sections, avoid overlapping passes excessively. Overlapping too much can lead to overworking the concrete.
- Address Imperfections Gently: If you encounter low spots or imperfections during the floating process, gently address them by adding small amounts of concrete or using light touches with the float.
- Evaluate the Finish: Periodically stop floating to evaluate the finish. If the surface appears smooth and has a consistent texture, it may be time to move on to the next finishing steps.
- Know When to Stop: Recognize the point where further floating will not improve the finish. As the concrete continues to set, it becomes less workable with the float, and additional passes may lead to an over-smooth surface.
- Consider the Application: Consider the intended application of the concrete. For exterior surfaces or areas where slip resistance is crucial, aim for a slightly coarser finish to improve traction.
By being attentive to the behavior of the concrete, understanding its setting characteristics, and following these tips, you can effectively use a wood float to achieve the desired finish without overworking the concrete surface. Remember that moderation and timing are essential in obtaining a high-quality and durable concrete finish.
Can you float concrete the next day?
Yes, you can float concrete the next day, but the optimal time to float concrete is typically within the first few hours after it has been poured. Floating concrete involves using a tool, such as a wood float or a magnesium float, to smooth and level the surface by consolidating the concrete and bringing excess water and paste to the surface.
Floating concrete while it is still in its plastic or workable state allows for easier manipulation and achieves a smoother finish. During this early stage, the concrete is more receptive to the action of the float, making it easier to fill voids and create a uniform surface.
If you miss the opportunity to float the concrete on the same day it was poured, you can still float it the next day, but it may require more effort. As concrete continues to cure and harden, it becomes less workable, and the surface may develop a hardened crust. Floating at this stage may not achieve the same level of smoothness as floating the fresh concrete, but it can still be effective in addressing minor imperfections and leveling the surface.
For best results, follow these tips when floating concrete the next day:
- Moisten the Surface: Before floating, dampen the concrete surface with water using a hose or a sprayer. This helps prevent the float from sticking to the concrete and allows for smoother maneuvering.
- Use the Right Float: Choose the appropriate float for the concrete condition. A wood float may work better for concrete that has partially cured, as it is more forgiving and less likely to overwork the surface compared to a more rigid magnesium float.
- Take Your Time: Be prepared for a bit more effort when floating older concrete. Work in small sections and take your time to achieve the desired finish.
- Inspect and Address Imperfections: Inspect the surface carefully for any low spots, air bubbles, or other imperfections. Address these issues by applying additional concrete or using the float to level and smooth the surface.
Remember that while you can float concrete the next day, it is always best to float it within the first few hours after pouring for the smoothest and most efficient results. However, even when floating at a later stage, proper technique and attention to detail can still yield a satisfactory finish.
When would I use a magnesium float vs a wood float?
The choice between using a magnesium float or a wood float in concrete work depends on the specific application and the desired finish. Both types of floats have their unique characteristics and advantages, making them suitable for different situations. Here’s when you would typically use a magnesium float vs. a wood float:
Magnesium Float:
- Smooth Finish: If you aim to achieve a smooth and polished finish on the concrete surface, a magnesium float is an excellent choice. Its smooth, flat surface helps consolidate the concrete and bring excess water and paste to the surface, resulting in a denser and more even finish.
- Early Floating: Magnesium floats are ideal for floating concrete during its plastic or workable state. The tool’s rigid design allows for efficient floating when the concrete is freshly poured and more receptive to manipulation.
- Larger Surfaces: For larger concrete surfaces, such as slabs or pavements, a magnesium float’s lightweight and wide blade enable faster coverage and smoother results.
Wood Float:
- Textured Finish: If you want to create a textured surface or specific patterns on the concrete, a wood float is a better choice. Its coarse surface helps produce various textures by manipulating the float in different directions or applying varying pressure.
- Later Stages: While wood floats can be used in the early stages of floating, they are also effective in later stages when the concrete has started to stiffen. The wood float’s forgiving nature allows for continued surface work even as the concrete becomes less workable.
- Edging and Detailing: Wood floats excel in edging and detailing work, as their versatility allows for precise control and achieving clean lines in tight spaces or corners.
- Repair and Patching: When patching or repairing existing concrete surfaces, a wood float is ideal for blending the new material with the old to create a seamless appearance.
In summary, use a magnesium float when you want a smooth and polished finish on freshly poured concrete surfaces and for larger concrete areas that require efficient floating. Choose a wood float when you desire textured finishes, need to perform detailed work, or when working with concrete at later stages of setting.
For certain projects, a combination of both types of floats can be advantageous, as it allows you to take advantage of their respective strengths and achieve a range of desired finishes. Having both magnesium and wood floats in your concrete toolkit ensures you are well-equipped for a variety of concrete finishing tasks.
editor's pick
news via inbox
Stay one step ahead with exclusive tips, guides, and offers delivered directly to your inbox.
Sign up for our newsletter and elevate your home improvement game today!