Mastering the Use of a Wheel Cutter: A Comprehensive Guide
A wheel cutter, also known as a tubing cutter or pipe cutter, is a simple yet powerful tool that finds numerous applications across various industries. With its ability to deliver clean and precise cuts, the wheel cutter has become a go-to solution for professionals and DIY enthusiasts alike. Let’s explore the diverse applications of this versatile tool and how it plays an essential role in different fields. We will also provide a step-by-step guide on how to use a wheel cutter effectively and efficiently to ensure the best cut possible.
If you need help finding a wheel cutter for any of the versatile applications listed below, check out our product review article here.
Unlocking Versatility: The Many Applications of a Wheel Cutter
Plumbing and Pipefitting
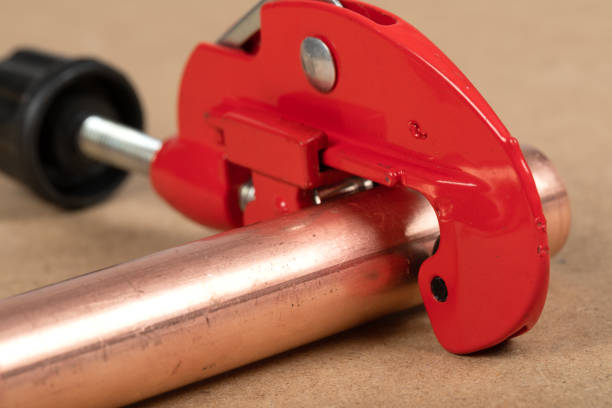
One of the primary applications of a wheel cutter is in plumbing and pipefitting tasks. Plumbers use wheel cutters to cut pipes made of materials such as copper, PVC, stainless steel, and more. Whether it’s repairing a broken pipe or installing new plumbing lines, the wheel cutter ensures accurate cuts, facilitating leak-free connections and efficient water flow.
HVAC (Heating, Ventilation, and Air Conditioning)
HVAC professionals frequently employ wheel cutters in their work to cut pipes and tubing used in heating and cooling systems. This allows them to customize the lengths of pipes to connect various HVAC components efficiently, ensuring optimal performance of heating and cooling units.
Automotive Repairs and Customizations
In the automotive industry, wheel cutters are indispensable for cutting brake lines, fuel lines, and other tubing within vehicles. They provide precise cuts that are vital for maintaining the safety and functionality of automotive systems. Moreover, enthusiasts and customizers use wheel cutters to modify and create custom exhaust systems and other automotive components.
Construction and Building Maintenance
Wheel cutters play a significant role in construction projects, where pipes are used for water supply, drainage, and gas lines. From large-scale constructions to small home improvements, wheel cutters assist in cutting pipes with accuracy, saving time and ensuring proper fitment. In building maintenance tasks, wheel cutters are relied upon for quick repairs and replacements of damaged pipes.
DIY and Home Improvement
For DIY enthusiasts and homeowners, a wheel cutter is a valuable addition to their toolkit. From simple plumbing repairs to installing irrigation systems and crafting custom metal or plastic tubing, the wheel cutter empowers homeowners to take on various projects with confidence.
Electrical Conduit Cutting
Electricians use wheel cutters to cut metal and plastic electrical conduits, which protect and route electrical wiring in buildings and structures. The clean cuts made by wheel cutters maintain the integrity of the conduits, ensuring safe and efficient electrical installations.
Crafts and Hobbies
In the world of crafts and hobbies, wheel cutters find applications in various projects. Whether it’s model building, jewelry making, or creating custom art installations, a wheel cutter allows for precise cuts on materials like copper, aluminum, and plastic tubing.
Industrial and Manufacturing Applications
Wheel cutters are widely used in industrial settings, where precise and clean cuts of tubes and pipes are crucial in manufacturing processes. From fabricating metal structures to creating intricate parts, wheel cutters help maintain accuracy and efficiency in production lines.
In conclusion, the wheel cutter’s versatility and precision make it an indispensable tool across a wide range of industries and applications. From plumbers and electricians to hobbyists and industrial manufacturers, professionals and DIYers alike rely on this simple yet effective cutting tool. With its ability to handle various materials and diameters, the wheel cutter continues to unlock new possibilities and streamline processes in numerous fields.
Step-By-Step Guide on How to Use a Wheel Cutter Effectively and Efficiently
Using a wheel cutter effectively requires attention to detail and proper technique to achieve clean and precise cuts. Whether you’re a professional or a DIY enthusiast, follow this step-by-step guide to use a wheel cutter efficiently and safely:
Step 1: Gather the Necessary Tools and Safety Equipment
Before starting, ensure you have the appropriate wheel cutter for the material and size of the pipe or tube you’ll be cutting. Also, wear safety goggles to protect your eyes from debris, especially when cutting metal pipes.
Step 2: Measure and Mark the Cutting Length
Measure the length you need to cut on the pipe or tube using a tape measure or ruler. Use a pencil or marker to mark the cutting line clearly. Double-check the measurements to ensure accuracy.
Step 3: Open the Wheel Cutter and Position it
Loosen any locking mechanisms and open the wheel cutter to create enough space to fit the pipe or tube. Position the cutter’s cutting wheel squarely on the marked cutting line, ensuring it aligns with the desired cutting length.
Step 4: Close the Cutter and Apply Light Pressure
Gently close the wheel cutter around the pipe or tube, aligning the cutting wheel with the marked line. Apply light pressure to secure the cutter in place. Make sure the cutter’s rollers are in contact with the pipe’s surface for stability.
Step 5: Rotate the Wheel Cutter Around the Pipe
With the cutter in place, begin rotating it around the pipe in the direction of the arrow marked on the cutter’s body. Apply consistent pressure while rotating to ensure a continuous and even cut.
Step 6: Continue Rotating and Cutting
As you rotate the cutter around the pipe, you’ll feel the cutting wheel gradually penetrate the material. Continue rotating and cutting until the wheel has made a complete cut through the pipe. The cutting process may require several rotations, depending on the pipe’s thickness and material.
Step 7: Inspect the Cut and Remove Any Burrs
Once you’ve completed the cut, carefully open the cutter and inspect the cut edge. It should be clean and smooth. If there are any burrs or rough edges, use a deburring tool or a file to remove them, ensuring a neat finish.
Step 8: Secure the Pipe Ends and Connect as Needed
If you are working with plumbing or other applications that require connection points, ensure the cut ends of the pipe are clean and free from debris. Secure the pipe ends using appropriate fittings or connectors according to your project requirements.
Step 9: Store the Wheel Cutter Safely
After using the wheel cutter, close any locking mechanisms and store it safely in a designated place. Properly store the cutter to protect its cutting wheel and ensure its longevity.
Remember, practice makes perfect. As you gain experience using a wheel cutter, you’ll become more proficient in achieving precise and clean cuts. Always prioritize safety, wear appropriate protective gear, and follow the manufacturer’s guidelines for your specific wheel cutter model.
Frequently Asked Questions
What should I never do with a wheel cutter?
When using a wheel cutter, there are certain practices you should avoid to ensure your safety, the tool’s effectiveness, and the quality of the cuts. Here are some important things you should never do with a wheel cutter:
- Never Force the Cutting Wheel: Avoid applying excessive force or pressure on the cutting wheel while using the wheel cutter. Let the sharp wheel do the cutting, and forcing it can lead to inefficient cuts, premature wear of the wheel, and potential damage to the cutter or the material being cut.
- Never Cut Hardened or Thick Steel: Single wheel cutters are not designed for cutting hardened or thick steel pipes or tubes. Attempting to cut such materials can damage the cutting wheel or even pose a safety hazard due to potential breakage.
- Never Use the Wrong Cutter for the Material: Ensure you are using the correct wheel cutter for the specific material you are cutting. For instance, if you are cutting copper, use a cutter designed for copper, and not one meant for plastic or other materials. Using the wrong cutter can result in poor cuts and potential damage to the tool.
- Never Overtighten the Cutter on the Pipe: While it’s essential to secure the wheel cutter on the pipe or tube before cutting, avoid overtightening the cutter. Over-tightening can cause distortion of the pipe’s shape or may even lead to crushing it, affecting the quality of the cut and potentially causing leaks in plumbing applications.
- Never Use a Damaged Cutter: Before using a wheel cutter, inspect it thoroughly for any damage or wear. Never use a cutter with a damaged or bent cutting wheel, as this can lead to uneven cuts, unsafe operation, and may even cause accidents.
- Never Use the Cutter Without Safety Gear: Always wear appropriate safety gear when using a wheel cutter. Safety goggles should be worn to protect your eyes from debris and metal shavings during the cutting process.
- Never Cut Without Proper Support: Ensure the pipe or tube being cut is adequately supported during the cutting process. Use a pipe vise or other secure means of support to prevent slippage or movement while cutting.
- Never Use the Cutter for Non-Intended Purposes: Wheel cutters are designed for cutting pipes and tubes. Avoid using the cutter for other tasks or materials not intended for its design, as this may lead to damage to the tool and reduced cutting effectiveness.
- Never Store the Cutter Improperly: After use, store the wheel cutter properly in a safe and designated place. Avoid tossing it haphazardly, as this may lead to damage to the cutting wheel or other parts.
By following these guidelines and never engaging in these prohibited practices, you can ensure a safe and effective cutting experience with your wheel cutter, prolonging its lifespan and maintaining high-quality cuts in your projects.
How do you sharpen a wheel cutter?
Sharpening a wheel cutter is essential to maintain its cutting efficiency and prolong its lifespan. The cutting wheel or blade of a wheel cutter can become dull over time due to regular use on hard materials. Here’s a step-by-step guide on how to sharpen a wheel cutter:
Materials Needed:
- Wheel cutter
- Safety goggles
- Fine-grit sharpening stone or diamond file
Step-by-Step Guide:
- Safety First: Before starting the sharpening process, put on safety goggles to protect your eyes from any debris that may come off during sharpening.
- Inspect the Cutting Wheel: Examine the cutting wheel to check for any chips, nicks, or excessive wear. If the cutting wheel is damaged beyond repair or too worn out, it’s best to replace it with a new one.
- Secure the Wheel Cutter: Place the wheel cutter on a stable surface or secure it in a vise to prevent movement during sharpening. Ensure that the cutting wheel is easily accessible for sharpening.
- Lubricate the Sharpening Stone: If you are using a sharpening stone, apply a few drops of honing oil or water (depending on the type of stone) to its surface. This lubrication helps to remove metal shavings and provides a smoother sharpening process.
- Sharpening the Cutting Wheel: Hold the wheel cutter firmly, and place the cutting wheel against the sharpening stone at the original cutting angle. Glide the wheel cutter back and forth across the stone, applying light pressure. Maintain the original angle to ensure an even sharpening of the entire circumference of the cutting wheel.
- Check Progress: After a few strokes, stop and inspect the cutting wheel’s edge. Look for any visible improvements in sharpness. Continue sharpening until you achieve a clean, sharp edge along the entire circumference of the cutting wheel.
- Alternate Sides (Optional): If the cutting wheel is double-sided, you can flip the wheel cutter and repeat the sharpening process on the other side. This ensures both sides of the cutting wheel are equally sharp and prolongs its usability.
- Clean the Cutting Wheel: Once you’re satisfied with the sharpness, wipe off any metal shavings or residue from the cutting wheel using a clean cloth.
- Test the Wheel Cutter: Before using the wheel cutter on actual pipes or tubes, do a test cut on a scrap piece of the same material. This will allow you to ensure the cutting wheel’s sharpness and make any necessary adjustments before proceeding with your project.
Remember, while sharpening the cutting wheel can extend its lifespan, it is not a permanent solution. Over time, the cutting wheel will eventually wear out and need replacement. Always follow the manufacturer’s guidelines for sharpening and replacing cutting wheels, and use the appropriate sharpening tools to maintain the wheel cutter’s performance effectively.
What is the advantage of a single wheel cutter?
The advantage of a single wheel cutter lies in its simplicity, ease of use, and versatility for cutting a wide range of materials. Here are some key advantages of using a single wheel cutter:
- Simplicity and Portability: Single wheel cutters are typically compact and lightweight, making them easy to carry around and use in various locations. Their simple design consists of a single cutting wheel and a handle, making them user-friendly, especially for DIY enthusiasts and occasional users.
- Versatility: Single wheel cutters are designed to cut various materials, including copper, aluminum, brass, plastic, and thin-walled steel tubing. This versatility allows users to work on different projects without the need for multiple cutting tools, saving both time and money.
- Precise and Clean Cuts: The sharp cutting wheel of a single wheel cutter enables precise and clean cuts. It ensures that the pipe or tube being cut retains its shape and integrity, leading to leak-free connections and enhanced overall performance.
- Tight Space Accessibility: Single wheel cutters are ideal for cutting in tight and confined spaces, where larger cutting tools might not be able to reach. Their compact design allows users to work efficiently even in challenging areas.
- Ease of Adjustment: Many single wheel cutters feature an easy-to-use adjustment mechanism that allows users to set the cutting depth quickly. This feature is valuable for achieving accurate cuts without damaging the pipe or tube.
- Cost-Effective: Compared to more complex cutting tools, single wheel cutters are generally more affordable. They provide a cost-effective cutting solution without compromising on the quality of the cuts.
- Durable Construction: Despite their simple design, many single wheel cutters are made from durable and robust materials, ensuring long-lasting performance and resistance to wear and tear.
- Ideal for DIY Projects: Single wheel cutters are popular among DIY enthusiasts and homeowners who frequently take on various projects. They offer an accessible and efficient cutting tool for home repairs, plumbing tasks, and other DIY applications.
- No Deformation or Crushing: The cutting wheel’s rolling action ensures that the pipe or tube is cut without deformation or crushing, resulting in a clean and consistent cut.
Overall, the advantage of a single wheel cutter lies in its versatility, ease of use, and ability to deliver precise cuts across a variety of materials. Whether you are a professional plumber or a DIY enthusiast, a single wheel cutter is a reliable and valuable tool to have in your toolkit.
What is the disadvantage of a single wheel cutter?
While single wheel cutters offer various advantages, they also come with some limitations and disadvantages that users should be aware of:
- Limited Cutting Capacity: One of the main disadvantages of a single wheel cutter is its limited cutting capacity. Compared to larger and more specialized cutters, single wheel cutters may not be suitable for cutting thicker or larger-diameter pipes and tubes. They are best suited for thinner-walled materials within a specific range of diameters.
- Not Suitable for Hard Materials: Single wheel cutters may struggle to cut through hard materials like thick steel or hardened metals. Attempting to cut such materials with a single wheel cutter may result in premature wear of the cutting wheel or ineffective cutting.
- Slower Cutting Speed: Single wheel cutters typically require more rotations to complete a cut compared to larger and more robust cutters. This can make the cutting process slower, especially when working on numerous cuts or larger projects.
- Less Durable than Heavy-Duty Cutters: While many single wheel cutters are constructed from durable materials, they may not be as robust as heavy-duty cutters designed for industrial use. Frequent use on tough materials may lead to quicker wear and the need for more frequent replacements.
- Limited Cutting Range: The cutting range of a single wheel cutter may not cover the full spectrum of pipe and tube sizes that other specialized cutters can handle. Users may need to invest in additional cutting tools for specific projects requiring a broader cutting range.
- More Effort Required for Hard Materials: When cutting through harder materials, users may need to apply more force and effort to achieve a clean and precise cut. This can be tiring and may result in less consistent cuts.
- Less Stability in Tight Spaces: While single wheel cutters are designed for tight spaces, their compact size may lead to less stability during cutting. Users should take extra care to maintain a steady hand and proper positioning to avoid misalignment.
- Limited Deburring Capability: Some single wheel cutters may lack built-in deburring tools or features. As a result, users may need to use a separate deburring tool or file to remove burrs and rough edges after cutting.
Despite these disadvantages, single wheel cutters remain valuable tools for various applications, especially for DIY projects and occasional use. Professionals and heavy users may prefer more specialized and heavy-duty cutters to address the limitations of single wheel cutters. When choosing a wheel cutter, consider the specific materials and diameters you will be working with, as well as the frequency of use and the type of projects you’ll undertake.
editor's pick
news via inbox
Stay one step ahead with exclusive tips, guides, and offers delivered directly to your inbox.
Sign up for our newsletter and elevate your home improvement game today!