Mastering Use of the Taping Knife: A Comprehensive Guide
Taping knives, also known as drywall knives or joint knives, are indispensable tools in the world of construction, renovation, and DIY projects. These versatile hand tools are not limited to just drywall work; they find numerous applications in a wide range of tasks, thanks to their unique design and functionality. In this article, we’ll explore the various applications of taping knives and how they can be used beyond the realm of drywall. We will also provide a step-by-step guide on how to use a taping knife effectively and efficiently.
If you need help finding a taping knife for any of the versatile applications listed below, check out our product review here.
The Versatility of the Taping Knife: Exploring Various Applications
Drywall Installation and Taping
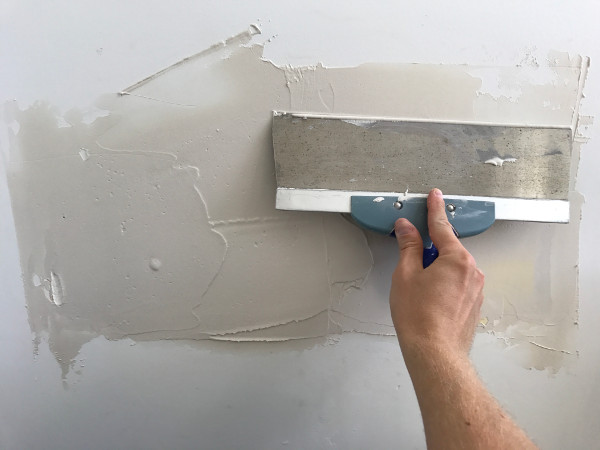
The primary and most common use of a taping knife is, of course, for drywall installation and taping. During the drywall installation process, taping knives are used to apply joint compound to the seams and joints between drywall sheets. This process, known as taping and mudding, creates a seamless surface that hides the seams and imperfections, resulting in a smooth and professional finish. The flexibility of the taping knife’s blade allows for even application of the joint compound, ensuring a consistent appearance across the surface.
Drywall Finishing
Once the joint compound has been applied to the drywall seams, the taping knife continues to play a crucial role in the finishing process. With careful skill and technique, the taping knife is used to feather and smooth the edges of the joint compound, creating a seamless transition between the compound and the surrounding drywall. This process, known as feathering, ensures that the finished wall or ceiling appears flat and uniform, ready for painting or other finishes.
Patching and Repairing Walls
Beyond drywall installation, taping knives are invaluable for patching and repairing walls and ceilings. Whether it’s fixing small holes, cracks, or dents, a taping knife allows for precise application of patching materials, such as spackle or joint compound, ensuring a seamless blend with the surrounding surface. This makes it a handy tool for homeowners and DIY enthusiasts looking to tackle minor repairs and touch-ups around the house.
Applying Putty and Filler
Taping knives are not limited to just drywall work; they are also useful in other applications that involve applying putty or filler to various surfaces. For instance, in woodworking projects, taping knives can be used to fill nail holes or imperfections in wood surfaces before painting or staining. The flexibility of the taping knife’s blade allows for smooth and even application, ensuring a neat and professional finish.
Spreading Adhesives and Glues
When working on projects involving adhesives or glues, a taping knife can be an excellent tool for spreading the adhesive evenly across a surface. This is particularly useful for projects like installing tile, vinyl flooring, or applying wallpaper. The wide, flat blade of the taping knife facilitates uniform distribution, leading to a more secure and aesthetically pleasing result.
Removing Excess Material
Taping knives can also be employed for removing excess material, such as dried joint compound, spackle, or adhesive, from surfaces. The flat, rigid blade allows for precise scraping, making it easier to clean up after a project or correct mistakes.
Conclusion
In conclusion, the taping knife’s versatility extends far beyond its traditional role in drywalling. From drywall installation and finishing to patching, repairing, applying putty, spreading adhesives, and more, this multifaceted tool proves its worth in various construction, renovation, and DIY tasks. Whether you’re a professional contractor or a weekend warrior, having a reliable taping knife in your toolkit is an investment in efficiency and quality, enabling you to achieve seamless and professional results across a diverse range of projects.
Step-By-Step Guide on How to Use a Taping Knife Effectively and Efficiently
Using a taping knife effectively and efficiently is essential for achieving smooth and professional drywall finishes. Whether you’re a seasoned professional or a DIY enthusiast, follow this step-by-step guide to make the most out of your taping knife and ensure a seamless result:
Step 1: Prepare the Drywall Surface
- Ensure that the drywall surface is clean, free from dust, and properly installed. Repair any imperfections, such as holes or cracks, before starting the taping process.
Step 2: Mix and Apply Joint Compound
- Prepare the joint compound according to the manufacturer’s instructions.
- Using a hawk or a mud pan, load the joint compound onto the taping knife’s blade. Start with a small amount to avoid wastage.
- Hold the taping knife at a slight angle (approximately 30 degrees) and apply the joint compound over the seam or joint between drywall sheets. Work from the center outwards to achieve an even distribution.
Step 3: Embed the Tape
- Place the drywall tape over the joint compound while it is still wet. Gently press the tape into the compound using the taping knife. Ensure that the tape is flat and free from wrinkles or bubbles.
Step 4: Apply Second Coat
- After embedding the tape, apply a second coat of joint compound over the tape. Extend the width of the compound slightly beyond the edges of the tape to create a smooth transition.
Step 5: Feather the Edges
- Once the second coat is applied, use the taping knife to feather the edges of the compound. Hold the knife at a shallower angle (approximately 10-15 degrees) and smooth out the compound along the edges. This process helps blend the compound into the surrounding drywall, creating a seamless finish.
Step 6: Repeat for Additional Coats (If Necessary)
- Depending on the level of finish required, you may need to apply additional coats of joint compound, each wider than the previous one. Feather the edges of each coat to achieve a gradual taper.
Step 7: Sand the Surface
- Allow the joint compound to dry completely before sanding the surface to achieve a smooth and uniform finish. Use a sanding sponge or sanding block to gently sand the dry compound until it is even with the surrounding drywall.
Step 8: Inspect for Imperfections
- After sanding, inspect the surface for any remaining imperfections. If needed, touch up the areas with a thin layer of joint compound and repeat the sanding process.
Step 9: Clean the Taping Knife
- Properly clean the taping knife after each use. Remove any dried joint compound or residue using a putty knife or a damp cloth.
Step 10: Store the Taping Knife Properly
- Store your taping knife in a dry and clean location to prevent rust or damage. Keep it in a sheath or case to protect the blade.
By following these steps, you can use a taping knife effectively and efficiently, achieving professional-quality drywall finishes and making your drywall projects a success. Remember that practice and attention to detail are key to mastering the art of taping and achieving flawless results. Happy taping!
Frequently Asked Questions
What are some things I should never do with a taping knife?
When working with a taping knife, there are certain practices you should avoid to ensure safety, maintain the tool’s effectiveness, and achieve professional-quality results. Here are some things you should never do with a taping knife:
- Never Use the Taping Knife as a Screwdriver or Pry Bar: Taping knives are not designed to be used as screwdrivers or prying tools. Using them for such tasks can damage the blade, handle, or tip, and it may also result in injury to yourself or others.
- Never Apply Excessive Pressure: Avoid pressing too hard or forcing the taping knife when applying joint compound or smoothing the surface. Applying excessive pressure can create uneven compound application and affect the overall finish of the drywall.
- Never Leave the Taping Knife in Water or a Wet Environment: Taping knives have metal blades, and leaving them in water or a wet environment can lead to rusting and damage over time. After use, clean the taping knife thoroughly, and store it in a dry place.
- Never Use a Damaged Taping Knife: Inspect your taping knife regularly for any signs of damage, such as bent or chipped blades, loose handles, or cracks. Do not use a damaged taping knife, as it may affect the quality of your work and pose safety hazards.
- Never Mix Joint Compound with an Unsuitable Material: Use joint compound as instructed by the manufacturer and avoid mixing it with other substances or additives that could affect its performance or drying time.
- Never Drag the Taping Knife Over Dry Compound: When feathering the edges of the compound, avoid dragging the taping knife over dry or partially dried compound. This can leave unwanted lines and imperfections on the surface.
- Never Skip the Proper Cleaning and Maintenance: After each use, clean your taping knife thoroughly with warm water and a soft brush or cloth. Dry it completely and store it properly in a safe place. Regularly inspect and maintain your taping knife to ensure it remains in good working condition.
- Never Apply Wet Tape Over Wet Joint Compound: Applying wet tape over wet joint compound can lead to adhesion issues and may weaken the overall finish. Allow the first coat of compound to dry completely before applying subsequent coats or wet tape.
- Never Leave the Taping Knife Unattended: Always keep an eye on your taping knife during work, and never leave it unattended or within reach of children or pets.
By avoiding these common mistakes and practicing proper usage and maintenance, you can prolong the life of your taping knife and achieve consistent, high-quality results in your drywall projects.
What angle should I hold a taping knife when mudding?
When mudding with a taping knife, the ideal angle to hold the knife is typically around 30 degrees. This angle allows for proper control and even distribution of the joint compound (mud) as you apply it over the seams and joints between drywall sheets.
Here’s how to achieve the correct angle when mudding with a taping knife:
- Load the Joint Compound: Load the joint compound onto the taping knife’s blade using a hawk or a mud pan. Start with a small amount of mud to avoid wastage.
- Hold the Knife at 30 Degrees: As you apply the joint compound, hold the taping knife at a slight angle of approximately 30 degrees to the drywall surface. This angle allows the blade to spread the compound smoothly and evenly over the seam or joint.
- Work from the Center Outwards: Begin applying the joint compound at the center of the seam or joint and work your way outward. Use even pressure on the knife as you move along the seam.
- Maintain Consistent Pressure: Keep a steady and consistent pressure on the taping knife to ensure an even layer of compound is applied. Avoid pressing too hard, as this can create uneven and excessive buildup of mud.
- Avoid Bubbles and Wrinkles: As you spread the compound, pay attention to any bubbles or wrinkles that may form under the tape. Gently press the tape into the compound with the taping knife to ensure it adheres smoothly.
- Feather the Edges: After embedding the tape and applying the joint compound, feather the edges of the compound to create a smooth transition with the surrounding drywall. For feathering, you’ll want to hold the taping knife at a shallower angle, approximately 10-15 degrees.
By holding the taping knife at a 30-degree angle and working with steady and consistent pressure, you can achieve a seamless and professional finish when mudding drywall seams and joints. Practice and attention to detail will help you improve your technique and achieve the best results in your drywall projects.
How thick should drywall mud be for taping when using a taping knife?
Before taping with a taping knife, the ideal thickness of drywall mud, also known as joint compound or mud, should be relatively thin. The mud should be applied in a thin layer to embed the drywall tape effectively and avoid excessive buildup, which can lead to difficulties in achieving a smooth and seamless finish.
The recommended thickness of the drywall mud for the initial coat, before taping, is usually around 1/8 inch (approximately 3mm). This thin layer of mud is sufficient to provide a secure base for the drywall tape to adhere to and helps prevent air pockets or bubbles from forming under the tape.
Here’s a step-by-step guide to preparing the drywall mud before taping:
- Mix the Joint Compound: Prepare the joint compound according to the manufacturer’s instructions. Use a drill with a paddle attachment or a mud mixer to ensure a smooth and consistent texture.
- Load the Taping Knife: Load the taping knife with a small amount of mud from a hawk or a mud pan. Start with a relatively small portion to avoid applying too much mud at once.
- Apply the Mud: Hold the taping knife at a slight angle, approximately 30 degrees, and apply the mud over the seams and joints between drywall sheets. Work from the center outwards to achieve an even distribution of the mud.
- Embed the Drywall Tape: While the mud is still wet, place the drywall tape over the seam or joint and gently press it into the mud using the taping knife. Ensure that the tape is flat and free from wrinkles or bubbles.
- Smooth the Surface: After embedding the tape, use the taping knife to smooth the surface of the mud and ensure the tape is securely adhered. Feather the edges of the mud slightly to create a seamless transition.
- Let It Dry: Allow the first coat of mud to dry completely before applying subsequent coats. Drying time can vary depending on factors such as humidity and temperature.
Remember that the purpose of the initial mud coat is to create a solid foundation for the tape and subsequent layers. Applying a thin and even layer of mud allows for better control and reduces the amount of sanding required later in the finishing process. For additional coats, you can gradually increase the thickness of the mud as needed, but avoid building up too much thickness at once to maintain a smooth and professional finish.
Do you wet drywall tape before applying?
Yes, wetting drywall tape before applying it is a common practice in drywall installation and taping. Wetting the tape helps to activate the adhesive on the back of the tape, making it more pliable and improving its adhesion to the joint compound (mud) and the drywall surface.
Here’s how to wet drywall tape before applying it:
- Prepare the Tape: Cut the drywall tape to the desired length, allowing some extra length to overlap the seams or joints.
- Wet the Tape: Moisten the drywall tape by either dipping it in a bucket of clean water or using a spray bottle to lightly dampen it. Ensure the tape is evenly moistened, but avoid soaking it.
- Remove Excess Water: Gently squeeze the excess water out of the tape using your hands or a clean cloth. The tape should be damp but not dripping wet.
- Embed the Tape: With the damp tape in hand, position it over the seam or joint where you want to apply it. Use a taping knife or your fingers to press the tape into the joint compound that was applied before. The moisture on the tape helps it adhere better to the compound.
- Smooth and Remove Bubbles: As you press the tape into the mud, use a taping knife or a drywall knife to smooth it out and remove any air bubbles or wrinkles that may have formed under the tape.
Wetting the drywall tape is particularly beneficial when working in drier or low-humidity environments, as it prevents the tape from drying out too quickly, which can lead to poor adhesion and potential cracking. It also gives you a bit more working time to position the tape correctly before it adheres to the joint compound.
However, it’s important not to oversaturate the tape, as excessive moisture can weaken the adhesive and affect its ability to stick properly. Additionally, always allow the first coat of joint compound to dry completely before applying subsequent coats, as applying wet tape over wet compound can lead to adhesion issues and a weaker finish.
In summary, wetting drywall tape before applying it is a beneficial step in the taping process, improving the tape’s adhesion and flexibility, and ultimately contributing to a smoother and more durable drywall finish.
editor's pick
news via inbox
Stay one step ahead with exclusive tips, guides, and offers delivered directly to your inbox.
Sign up for our newsletter and elevate your home improvement game today!