Mastering Use of a Faucet-Seat Wrench: A Comprehensive Guide
A faucet-seat wrench is a simple yet indispensable tool that finds diverse applications in the world of plumbing and household maintenance. This specialized wrench is designed to tackle the essential task of removing and installing faucet seats, those tiny components inside faucets that ensure a watertight seal when the faucet is turned off. While the primary purpose of a faucet-seat wrench is straightforward, its versatility extends beyond this core function. Let’s explore the various applications of a faucet-seat wrench and how it contributes to smooth plumbing experiences. We will also provide a step-by-step guide on how to use a faucet-seat wrench effectively and efficiently.
If you need help finding a faucet-seat wrench for any of the versatile applications listed below, see our product review article here.
Exploring the Versatile Applications of a Faucet-Seat Wrench
Faucet Repair and Maintenance
The most obvious application of a faucet-seat wrench is in repairing and maintaining faucets. As faucets age, the seats can become corroded or damaged, leading to leaks and reduced water flow. A faucet-seat wrench allows easy access to the faucet seat, enabling users to remove the old seat and replace it with a new one, effectively resolving leaks and restoring the faucet’s functionality. Whether you are a professional plumber or a DIY enthusiast, having a faucet-seat wrench in your toolbox is a must for swift and efficient faucet repairs.
Threaded Faucet Seats
Some faucets have threaded faucet seats, which require a specialized faucet-seat wrench to remove and install. These wrenches have a specific design to fit the threading on the seat securely. Without the right tool, attempting to work with threaded faucet seats can be challenging and may lead to damage. A faucet-seat wrench designed for threaded seats ensures a smooth and safe removal and installation process.
Tapered Faucet Seats
Tapered faucet seats are found in certain faucet models where the seat tapers towards the bottom. For these seats, a tapered faucet-seat wrench is necessary. The tapered design allows for easy access to confined spaces behind the faucet, making it suitable for hard-to-reach faucet seats. This specialized wrench is a valuable addition to any plumber’s toolkit, especially when dealing with specific faucet configurations.
Diverse Faucet Models
Faucet-seat wrenches come in various sizes and configurations, catering to different faucet models and seat types. The versatility of these wrenches ensures they can handle a wide range of faucets, making them suitable for both residential and commercial applications. Whether you’re dealing with standard faucets, single-handle faucets, or widespread faucets, a faucet-seat wrench can tackle the task efficiently.
Plumbing Projects
Beyond faucet repair, a faucet-seat wrench can prove useful in various plumbing projects. For instance, it can be employed to access and remove stuck or corroded nuts in tight spaces under the sink or in other plumbing fixtures. Its slim design and effective grip make it an excellent tool for hard-to-reach spots.
Home Improvement and DIY Projects
A faucet-seat wrench is not just for plumbers; it’s also a handy tool for homeowners engaged in DIY projects. Whether you’re replacing a faucet, repairing a dripping spout, or handling other plumbing tasks around the house, a faucet-seat wrench ensures that you have the right tool for the job.
In conclusion, a faucet-seat wrench is a versatile and indispensable tool in the world of plumbing and household maintenance. Its primary application lies in faucet repair and maintenance, but its adaptability extends to various faucet models, threaded and tapered seats, and numerous plumbing and DIY projects. For anyone involved in plumbing work or home improvement, a high-quality faucet-seat wrench is a valuable investment that guarantees efficient and hassle-free faucet maintenance and repair experiences.
Step-By-Step Guide on How to Use a Faucet-Seat Wrench Effectively and Efficiently
Using a faucet-seat wrench effectively and efficiently is essential for successful faucet seat removal and installation. Follow this step-by-step guide to ensure smooth plumbing experiences:
Step 1: Gather the Necessary Tools
Before starting, make sure you have all the required tools, including the faucet-seat wrench, an adjustable wrench (if needed), towels or rags, a bucket or container, plumber’s putty or silicone sealant, Teflon tape, and the replacement faucet seat.
Step 2: Shut Off the Water Supply
Locate the shut-off valves under the sink and turn them off to cut off the water supply to the faucet.
Step 3: Clear the Area and Prepare the Work Space
Remove any items from under the sink to create ample space for working comfortably. Place towels or rags inside the cabinet to catch any water that may spill during the process.
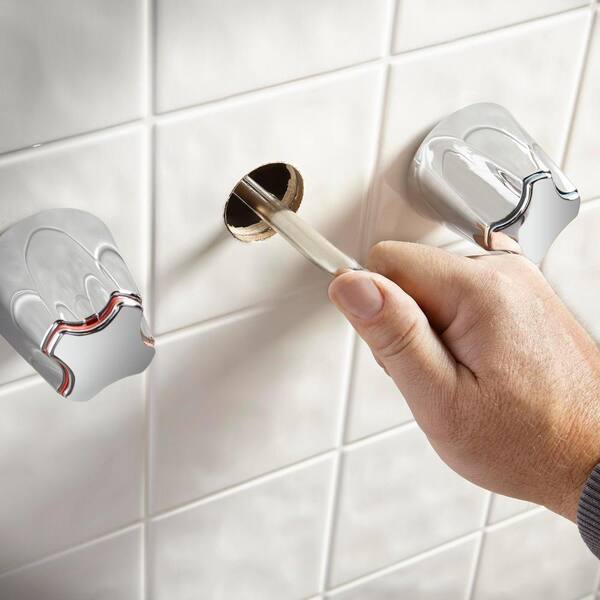
Step 4: Access the Faucet Seat
Use a flashlight to locate the faucet seat inside the faucet body. You may need to remove the faucet handle and other components to access the seat.
Step 5: Select the Correct Wrench and Position It
Choose the appropriate faucet-seat wrench for the type of seat in your faucet. If you have a tapered faucet seat, position the tapered end of the wrench into the seat. If you have a threaded faucet seat, ensure the wrench fits snugly onto the seat’s threading.
Step 6: Loosen the Faucet Seat
Hold the faucet-seat wrench firmly in position and turn it counterclockwise to loosen the seat. Use steady pressure and avoid using excessive force to prevent damage.
Step 7: Remove the Old Faucet Seat
Once the seat is loosened, lift it out of the faucet body using the wrench or your fingers. Inspect the seat for any damage or wear, and clean the area inside the faucet body if needed.
Step 8: Prepare the New Faucet Seat
Apply a small amount of plumber’s putty or silicone sealant to the bottom of the new faucet seat. This will help create a watertight seal when the seat is installed.
Step 9: Install the New Faucet Seat
Position the new faucet seat into the faucet body, making sure it fits snugly. Use the faucet-seat wrench to turn the seat clockwise to tighten it securely. Again, avoid using excessive force to prevent damage.
Step 10: Reassemble the Faucet Components
Reattach the faucet handle and any other components that were removed to access the faucet seat.
Step 11: Reconnect Water Supply Lines
If you disconnected the water supply lines during the process, use an adjustable wrench to reconnect them to the faucet. Wrap Teflon tape around the threads to create a secure and leak-free connection.
Step 12: Turn On the Water Supply and Check for Leaks
Turn on the shut-off valves to restore water supply to the faucet. Check for any leaks around the faucet and handle. If you notice any leaks, tighten the connections as needed.
Step 13: Clean Up and Test the Faucet
Clean up any water spills and debris from the work area. Test the faucet to ensure it is functioning correctly and that there are no leaks.
By following these steps, you can use a faucet-seat wrench effectively and efficiently, successfully completing faucet seat maintenance and repairs with ease. Always remember to exercise caution and avoid using excessive force during the process to prevent damage to the faucet and its components. If you encounter any difficulties or are unsure about any step, consider seeking assistance from a professional plumber.
Frequently Asked Questions
How do you remove a stubborn faucet seat when using a faucet-seat wrench?
Removing a stubborn faucet seat can be a challenging task, even when using a faucet-seat wrench. However, with some extra effort and the right approach, you can increase your chances of success. Here’s a step-by-step guide on how to remove a stubborn faucet seat using a faucet-seat wrench:
Step 1: Apply Penetrating Oil
Before attempting to remove the stubborn faucet seat, apply some penetrating oil or a rust-busting agent to the seat. Allow the oil to penetrate and loosen any rust or corrosion that might be causing the seat to stick.
Step 2: Allow the Oil to Soak In
Give the penetrating oil some time to work its magic. Depending on the severity of the corrosion, it may take a few minutes or even several hours for the oil to loosen the stubborn seat.
Step 3: Choose the Right Wrench and Position It Properly
Ensure you are using the correct faucet-seat wrench for your particular faucet seat. Position the wrench securely onto the seat, making sure it fits snugly.
Step 4: Use Steady Pressure
Apply steady and controlled pressure to the faucet-seat wrench while turning it counterclockwise to loosen the seat. Avoid using sudden jerks or excessive force, as this may cause the wrench to slip and damage the faucet or the seat.
Step 5: Use a Longer Handle for More Leverage
If the faucet-seat wrench alone isn’t providing enough leverage, try using a pipe or a piece of metal tubing to extend the handle of the wrench. This added length will give you more torque and make it easier to break the seat free.
Step 6: Tap the Wrench Gently
While applying pressure, you can gently tap the handle of the wrench with a rubber mallet or a hammer. The impact can help to dislodge the seat if it’s stuck due to rust or sediment buildup.
Step 7: Heat the Seat (As a Last Resort)
If all else fails, as a last resort, you can use a heat gun or a propane torch to carefully apply heat to the faucet body around the seat. The heat can expand the metal, helping to break the bond between the seat and the faucet body. Be extremely cautious when using heat to avoid damaging the faucet or causing a fire hazard.
Step 8: Prevent Future Stuck Seats
After successfully removing the stubborn seat, consider applying a thin layer of plumber’s grease or silicone lubricant to the threads of the new seat before installing it. This can help prevent future corrosion and make it easier to remove the seat when needed.
Note: If you find that the faucet seat is severely corroded or damaged beyond repair, it may be best to replace the entire faucet to avoid further complications. In such cases, it’s advisable to seek the help of a professional plumber to ensure a smooth and trouble-free faucet replacement.
Remember that dealing with stubborn faucet seats can be challenging and requires patience. If you encounter difficulties or feel unsure about the process, don’t hesitate to seek assistance from a professional plumber.
What should I never do with a faucet-seat wrench?
Using a faucet-seat wrench correctly is essential for successful faucet maintenance and repairs. To ensure safe and effective use, there are several things you should never do with a faucet-seat wrench:
- Avoid Using Excessive Force: Never apply excessive force when using a faucet-seat wrench to remove a stubborn faucet seat. Using too much force can lead to slipping, which may cause damage to the faucet body or the seat itself.
- Don’t Use the Wrong Size: Never use a faucet-seat wrench that does not properly fit the faucet seat. Using the wrong size wrench can result in an improper grip, increasing the risk of damaging the seat or the faucet.
- Don’t Twist the Wrench Abruptly: Avoid sudden, jerky movements while turning the wrench. Twisting the wrench abruptly can cause it to lose its grip on the seat, potentially damaging the faucet or causing injury.
- Never Ignore Safety Precautions: Always turn off the water supply to the faucet before attempting any repairs. Ignoring this step can lead to water leaks and create a mess while working.
- Avoid Using the Wrench on Other Parts: A faucet-seat wrench is specifically designed for faucet seats. Do not use the wrench on other components of the faucet or plumbing fixtures, as it may cause damage.
- Don’t Overheat the Faucet Body: If you resort to using heat to loosen a stubborn seat, be cautious not to overheat the faucet body. Overheating can damage the faucet’s internal components or even create a fire hazard.
- Never Reuse Old Faucet Seats: It’s best not to reuse old faucet seats after they have been removed. Over time, faucet seats can develop wear and corrosion, leading to leaks. Always replace old seats with new ones to ensure a proper seal.
- Avoid Ignoring Manufacturer Guidelines: Follow the manufacturer’s guidelines and recommendations for using the faucet-seat wrench and any other tools. Ignoring the guidelines can lead to unintended consequences and void warranties.
- Don’t Skip Regular Maintenance: Regularly inspect and maintain your faucets to prevent severe damage to the seats and other components. Regular maintenance can help catch issues early on and avoid costly repairs.
- Never Use the Wrench on Plastic Parts: If your faucet has plastic components, avoid using the wrench on these parts. Plastic is more susceptible to damage, and using the wrench on plastic components can result in cracking or breaking.
By avoiding these common mistakes and using the faucet-seat wrench with care, you can ensure a safe and successful faucet maintenance experience. If you encounter challenges or are unsure about using the wrench, consider seeking help from a professional plumber for assistance.
Do you have to replace a faucet seat?
In many cases, you do not have to replace a faucet seat. Faucet seats are small components located inside the faucet body that create a watertight seal when the faucet is turned off, preventing leaks at the spout. However, faucet seats can become worn, corroded, or damaged over time, leading to issues like leaks and reduced water flow.
Whether or not you need to replace a faucet seat depends on the severity of the seat’s condition and the type of faucet you have. Here are some scenarios to consider:
- Minor Wear or Surface Corrosion: If the faucet seat only has minor wear or surface corrosion, it may be possible to clean it with a seat-dressing tool or some fine sandpaper. This can help restore a smooth surface and create a better seal, avoiding the need for replacement.
- Moderate to Severe Corrosion or Damage: If the faucet seat is significantly corroded or damaged, cleaning or dressing it may not be sufficient. In such cases, it is advisable to replace the faucet seat to ensure a proper and long-lasting repair. Attempting to repair a severely damaged seat may result in continued leaks or a faulty seal.
- Unique Faucet Models: Some faucet models may have non-standard or proprietary faucet seats that are not readily available in the market. In such cases, finding a suitable replacement seat can be challenging, and replacing the entire faucet may be a more practical solution.
- Age and Condition of the Faucet: If your faucet is old and has been in use for many years, it may be more cost-effective and efficient to replace the entire faucet rather than just the seat. Old faucets can have multiple components showing signs of wear, and replacing individual parts may not guarantee a trouble-free solution.
- Professional Assessment: If you are unsure about the condition of the faucet seat or how to proceed with repairs, it’s best to seek the advice of a professional plumber. A plumber can inspect the faucet, assess the condition of the seat, and recommend the most appropriate course of action.
In summary, you do not always have to replace a faucet seat, especially if the seat is in good condition and minor wear can be remedied. However, when the seat is significantly corroded, damaged, or part of an older faucet with multiple issues, replacing the faucet seat or the entire faucet may be the best solution to ensure a reliable and leak-free faucet.
editor's pick
news via inbox
Stay one step ahead with exclusive tips, guides, and offers delivered directly to your inbox.
Sign up for our newsletter and elevate your home improvement game today!