Mastering the Use of Stripping Tape: A Comprehensive Guide
Stripping tape, commonly known as painter’s tape, is more than just a tool for protecting surfaces while painting. This versatile adhesive tape has found a myriad of creative applications beyond the traditional painter’s toolkit. From DIY projects to artistry and home improvement, stripping tape offers a world of possibilities to unleash your imagination. Let’s explore the various applications of stripping tape and discover how it can be an invaluable asset in your creative endeavors. We will also provide a step-by-step guide on how to use stripping tape effectively and efficiently.
If you need help finding stripping tape for any of the versatile applications listed below, check out our product review here.
Unlocking Creativity: The Many Applications of Stripping Tape
Painting and Home Improvement
The primary use of stripping tape remains in painting and home improvement projects. Its low-tack adhesive makes it ideal for creating clean and precise paint lines, preventing paint bleed and ensuring professional-quality results. Whether you’re painting walls, ceilings, trim, or furniture, stripping tape helps you achieve sharp edges and defined patterns.
Decorative Wall Art
With the rise of wall art as a popular home decor trend, stripping tape has become an essential tool for creating stunning geometric patterns, stripes, and chevron designs on walls. By combining different tape thicknesses and colors, you can craft unique and eye-catching wall art that transforms any room.
Faux Finishes
Stripping tape opens up the world of faux finishes, allowing you to create the illusion of texture or architectural details. By layering paint over masked-off areas, you can mimic the look of brick, wood grain, or tile, adding depth and character to your walls and furniture.
Custom Furniture Makeovers
Give old furniture a fresh lease on life with creative paint applications using stripping tape. From modern abstract designs to classic stripes or intricate stencils, the possibilities are endless. Upcycling furniture with paint and tape can breathe new life into tired pieces and turn them into stylish and unique statement pieces.
Kid-Friendly Art Projects
Stripping tape offers a mess-free and fun way for kids to explore their creativity. Encourage young artists to create their masterpieces by masking off areas on canvas or paper and applying paint or other art supplies within the boundaries.
Handmade Greeting Cards
For those who enjoy paper crafts, stripping tape can be a valuable tool for making handmade greeting cards. Use it to create borders, frames, or intricate designs on cards, adding a personal touch to special occasions.
Temporary Decorations
Hosting a party or celebrating a holiday? Stripping tape can be your best friend for creating temporary decorations. Make banners, garlands, or custom table settings by incorporating the tape into your decor.
Nail Art
In the world of beauty and fashion, stripping tape has become a favorite tool for nail art enthusiasts. By carefully applying tape to nails and painting over it with different colors, you can achieve sophisticated geometric patterns and intricate designs.
Stencil Making
Stripping tape can double as an alternative stencil material. Cut desired shapes or patterns from the tape, and apply them to surfaces for painting or crafting.
Personalized Labels
Organize and label items around your home or workspace using stripping tape. Cut out letters or shapes to create custom labels for storage containers, folders, and more.
In conclusion, stripping tape is a versatile and creative tool that extends far beyond its original purpose. From precision painting to artistic expressions, it opens up a world of possibilities for DIY enthusiasts, artists, and home decorators alike. So, the next time you have a creative project in mind, reach for stripping tape and let your imagination take flight!
Step-By-Step Guide on How to Use Stripping Tape Effectively and Efficiently
Using stripping tape effectively and efficiently is essential to achieving clean and precise paint lines in your projects. Whether you’re a seasoned DIY enthusiast or a beginner, following this step-by-step guide will help you make the most of this versatile tool:
Step 1: Gather Your Materials
- Stripping tape (painter’s tape) in the desired thickness and length.
- Surface to be painted (wall, furniture, canvas, etc.).
- Paint and other necessary painting supplies.
Step 2: Prepare the Surface
Ensure that the surface is clean, dry, and free of dust or debris. Any dirt or imperfections on the surface can affect the adhesion of the tape and the quality of the paint lines.
Step 3: Measure and Cut the Tape
Measure the length of the area where you want to apply the tape. Use scissors or a utility knife to cut the stripping tape to the desired length. For precise designs or patterns, consider using a ruler and pencil to mark the positions where the tape will be applied.
Step 4: Apply the Tape
Gently press the stripping tape onto the surface along the edges or boundaries of the area you want to protect. Ensure that the tape adheres firmly without any air bubbles or gaps. For intricate designs, carefully apply the tape following your marked guidelines.
Step 5: Burnish the Tape
To enhance the adhesion, use a smooth, flat tool (such as a credit card or a plastic scraper) to burnish the tape firmly onto the surface. This step helps create a better seal, preventing paint from bleeding under the edges.
Step 6: Paint with Care
Now that the tape is in place, proceed with your painting project. Be mindful not to apply excessive paint along the edges of the tape. Using a high-quality paintbrush or roller can help achieve better results.
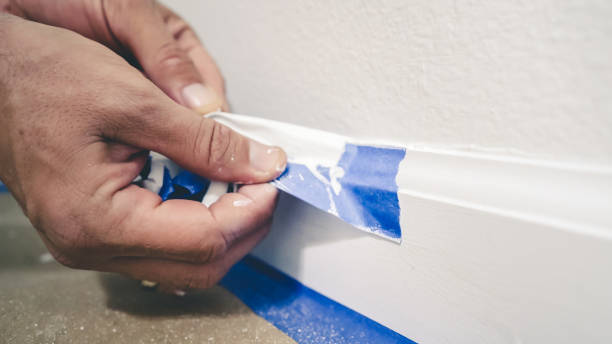
Step 7: Remove the Tape at the Right Time
Timing is crucial. As soon as you’ve finished painting, but before the paint is fully cured, gently remove the stripping tape. Peel it back slowly and at a 45-degree angle to the surface. Removing the tape too soon can cause smudging, while leaving it on for too long can make removal difficult and risk pulling off dried paint.
Step 8: Inspect the Paint Lines
After removing the tape, inspect the paint lines for any imperfections or bleeding. If needed, touch up any areas with a small paintbrush to achieve clean edges.
Step 9: Dispose of the Tape Properly
Discard the used stripping tape responsibly. Some tapes can be recycled, so check the packaging or local recycling guidelines.
Step 10: Clean Up
Clean your painting tools and brushes promptly after use to maintain their quality for future projects.
By following these steps, you can effectively and efficiently use stripping tape to achieve professional-quality paint lines and open up endless creative possibilities for your DIY and painting projects. Remember, practice makes perfect, so don’t be afraid to experiment and explore different designs and techniques with your stripping tape. Happy painting!
Frequently Asked Questions
What are some tips when peeling stripping tape?
Peeling stripping tape, also known as painter’s tape, requires some finesse to ensure a clean and smooth removal without damaging the painted surface or leaving behind adhesive residue. Here are some helpful tips to follow when peeling stripping tape:
- Timing is Key: It’s essential to remove the tape at the right time. If you remove it too soon, the paint may still be wet and could smudge. If you wait too long, the tape may become more difficult to remove, and there’s a higher chance of it pulling off dried paint along with it. Check the tape’s instructions for the recommended removal time, usually within 24 hours.
- Pull at an Angle: To prevent paint from peeling off with the tape, pull it back slowly and at a 45-degree angle to the surface. This angle minimizes the chance of lifting any paint along the edge.
- Warmth Helps: If the tape seems to be sticking too firmly, use a hairdryer or a heat gun set on low to gently warm the tape before peeling it. This can soften the adhesive and make removal easier.
- Don’t Rush: Take your time when peeling the tape. Rushing the process may lead to mistakes and a less-than-desirable result. Slow and steady peeling helps ensure clean lines.
- Double-Check the Adhesion: If you encounter resistance while peeling, pause and make sure you have removed all the air bubbles or gaps between the tape and the surface during application. Use a smooth, flat tool like a credit card to press down the tape firmly during application.
- Pull Back on Itself: If you notice the tape starting to lift the paint, stop peeling in that direction. Instead, fold the tape back on itself and try peeling it in a different direction. This can help prevent further damage.
- Use a Razor Blade (with caution): In some cases, if the tape is particularly stubborn, you can use a sharp razor blade to cut along the edge of the tape before peeling it off. Be extremely careful not to cut into the paint or the surface. This method should only be used if you are confident in your precision.
- Clean Edges with a Damp Cloth: After removing the tape, inspect the edges of the paint line. If there are any small imperfections or residue, gently clean them with a damp cloth or sponge.
By following these tips, you can achieve clean and precise paint lines without any mishaps during the peeling process. Proper removal of stripping tape is an essential step in achieving a professional and polished finish to your painting project.
How long is too long to leave stripping tape on?
The ideal time to remove stripping tape, also known as painter’s tape, can vary depending on the specific tape product and the paint used. However, as a general rule, it’s best to remove the tape within 24 hours of applying the paint.
Leaving the tape on for too long can lead to some potential issues:
- Difficult Removal: As time passes, the adhesive on the tape can become more firmly bonded to the painted surface, making it harder to peel off cleanly. This can result in the tape tearing or leaving behind sticky residue.
- Paint Bonding: If the paint has completely dried and cured, it can create a stronger bond with the tape. When you remove the tape at this point, there’s a higher risk of the paint peeling off along with the tape, causing an uneven paint line.
- Uneven Paint Lines: Leaving the tape on for an extended period can result in a visible edge where the tape was applied. This edge might not blend well with the rest of the painted surface, leading to an uneven and less polished appearance.
- Risk of Surface Damage: In some cases, if the tape is left on for too long, especially on delicate or porous surfaces, it may cause damage when removed. This can include peeling off paint, tearing wallpaper, or leaving adhesive residue that requires extra cleaning.
- Adhesive Residue: Even if the tape is removed without paint peeling, leaving it on for too long can lead to adhesive residue being left behind. This residue can be difficult to clean and may require extra effort to remove.
For best results, it’s essential to follow the manufacturer’s recommendations for the specific stripping tape you are using. Most painter’s tapes are designed for clean removal within 24 hours of application. If you anticipate a delay in your painting project, consider using an extended-release painter’s tape explicitly designed to stay on the surface for a more extended period without causing any damage or leaving residue. Always perform a test on a small, inconspicuous area before applying the tape to the entire surface to ensure it adheres well and can be removed cleanly within the desired timeframe.
Should you remove stripping tape when paint is wet or dry?
You should remove stripping tape, also known as painter’s tape, when the paint is dry to the touch but not fully cured. Removing the tape too soon while the paint is wet can cause smudging and bleeding along the edges. On the other hand, waiting too long until the paint is fully cured can make the tape more challenging to remove, increasing the risk of peeling off dried paint with the tape.
As we keep mentioning, the ideal time to remove painter’s tape is usually within 24 hours after painting. This timeframe allows the paint to set sufficiently without fully curing, ensuring clean and crisp paint lines when the tape is peeled off.
Here are some general guidelines for removing painter’s tape:
- Wait for the Recommended Time: Refer to the manufacturer’s instructions on the painter’s tape packaging for the recommended removal time. Most tapes are designed for clean removal within a specific timeframe, typically within 24 hours.
- Test a Small Area: If you are unsure about the right time to remove the tape, perform a test on a small, inconspicuous area. Wait for the paint to dry to the touch, and then carefully peel off a small section of the tape to see if it comes off cleanly without smudging or pulling off the paint.
- Remove at an Angle: When you’re ready to remove the tape, do so slowly and at a 45-degree angle to the surface. This angle helps prevent the tape from pulling up dried paint along with it.
- Use a Heat Gun (if needed): If the tape seems to be sticking too firmly, you can use a heat gun or a hairdryer set on low to gently warm the tape before peeling it off. This can soften the adhesive and make removal easier.
By following these guidelines and removing the painter’s tape at the right time, you can achieve clean and professional-looking paint lines without any issues during the removal process. Remember that proper surface preparation and precise application of the tape are also essential for achieving the best results.
One is one mistake that almost everyone makes with stripping tape?
One common mistake that almost everyone makes with stripping tape, especially when using it for the first time, is leaving the tape on for too long after painting. As mentioned earlier, it’s essential to remove the tape within the recommended timeframe, typically within 24 hours of painting.
Leaving the tape on for an extended period, such as several days or weeks, can lead to several issues. Incase you missed it above, common issues that can occur are restated here:
- Difficult Removal: The longer the tape stays on, the stronger the adhesive can bond with the painted surface. This can make the tape more difficult to peel off cleanly, increasing the risk of tearing the tape or leaving behind sticky residue.
- Paint Bonding: If the paint has fully dried and cured, it creates a stronger bond with the tape. When you remove the tape at this point, there’s a higher likelihood of the paint peeling off along with the tape, resulting in an uneven paint line.
- Uneven Paint Lines: Leaving the tape on for too long can cause visible edges at the boundary of the tape. When the tape is finally removed, the paint line might not blend well with the rest of the painted surface, leading to an uneven and less polished appearance.
- Surface Damage: On delicate or porous surfaces, leaving the tape on for an extended period can cause damage when removed. This can include peeling off paint, tearing wallpaper, or leaving behind adhesive residue that requires extra cleaning.
To avoid this mistake, it’s crucial to pay attention to the recommended removal time provided by the manufacturer of the painter’s tape. Most tapes are designed for clean removal within 24 hours of application. If you anticipate any delays in completing your painting project, consider using an extended-release painter’s tape designed to stay on the surface for a more extended period without causing damage or leaving residue.
By removing the stripping tape within the right timeframe, you can achieve sharp, clean paint lines and a professional finish to your painting project.
- Adhesion Strength: Some thicker painter’s tapes are designed with stronger adhesives, making them suitable for rough or porous surfaces where a more robust hold is required.
- Surface Type: Different tape thicknesses can be better suited to various surface types. For example, thinner tape might work better on delicate surfaces like wallpaper, while thicker tape might be more appropriate for rugged or uneven surfaces.
- Personal Preference: Some painters may have their preferences based on their experience and the familiarity of working with a specific tape thickness.
In summary, using different thicknesses of stripping tape allows painters to adapt their approach to various projects and surface types. Thin tape provides precision for intricate designs, while wider tape offers time and cost-efficiency for larger areas. The choice of tape thickness is ultimately dependent on the specific painting project’s needs and the level of detail required to achieve the desired results.
editor's pick
news via inbox
Stay one step ahead with exclusive tips, guides, and offers delivered directly to your inbox.
Sign up for our newsletter and elevate your home improvement game today!