Mastering Use of the Bricklayer’s Hammer
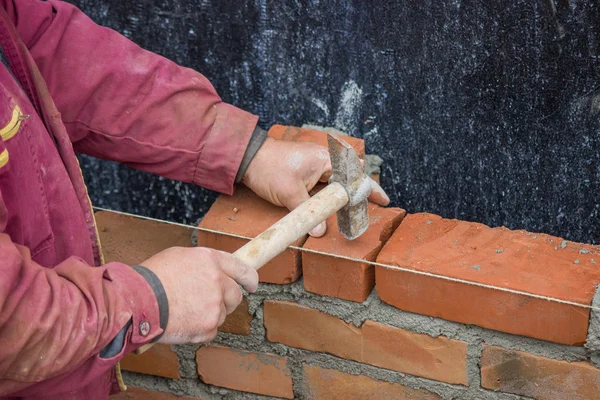
A bricklayer’s hammer, often referred to as a brick hammer or a masonry hammer, is a multifunctional hand tool that proves indispensable for bricklayers and masons in their construction and repair projects. This specialized hammer offers a variety of applications that go beyond traditional hammering tasks. Let’s delve into the diverse uses of a bricklayer’s hammer that make it an essential tool for professionals and DIY enthusiasts alike. We will also provide a step-by-step guide on how to a bricklayer’s hammer effectively and efficiently.
If you need help finding the best bricklayer’s hammer for any of the versatile applications listed below, see our product review article here.
Exploring the Versatility: The Many Applications of a Bricklayer’s Hammer
Brick Splitting and Chipping:
One of the primary applications of a bricklayer’s hammer is splitting bricks to create halves or smaller sections. The chisel edge on the opposite side of the hammer’s striking face allows masons to make precise cuts and control the shape of the brick as needed. This is especially useful when working with odd-shaped spaces or edges that require custom brick sizes.
Masonry Unit Shaping:
Brick masons often encounter situations where they need to shape bricks or other masonry units to fit specific angles or curves in a wall or structure. The bricklayer’s hammer is a valuable tool for chipping away small sections of a brick or stone to achieve the desired shape, ensuring a snug fit and a polished appearance.
Removing Excess Mortar:
After laying bricks, there might be excess mortar protruding between the joints. The bricklayer’s hammer comes to the rescue, enabling masons to chisel away the excess mortar and create clean and uniform joints. This process, known as “pointing,” enhances the aesthetics and longevity of the brickwork.
Setting and Aligning Bricks:
A crucial application of the bricklayer’s hammer is setting and aligning bricks during construction. The hammer’s striking face facilitates accurate placement of bricks, ensuring they are level and properly aligned with adjacent units. The controlled impact helps seat the bricks firmly in the mortar bed, creating a strong and stable structure.
Removing Damaged Bricks:
When bricks are damaged or need replacement, the bricklayer’s hammer proves invaluable. The tool allows masons to chip away damaged bricks and carefully remove them from the wall without causing harm to surrounding units. This precise removal process simplifies the replacement of damaged bricks, maintaining the structural integrity of the overall construction.
Prying and Levering:
The bricklayer’s hammer’s chisel edge can also function as a mini pry bar, useful for lifting bricks or stones slightly to adjust their position or to remove them when necessary. This prying ability streamlines the bricklayer’s workflow, reducing the need for additional tools.
Nailing and Fastening:
Some bricklayer’s hammers come equipped with a magnetic nail holder on the striking face, enabling one-handed nail placement. This feature enhances efficiency when attaching auxiliary components to brickwork, such as wood trim or support structures.
In conclusion, the bricklayer’s hammer is a versatile and indispensable tool for brick masons and construction professionals. Its unique combination of a striking face and chisel edge allows for precise brick shaping, cutting, and setting. Whether it’s splitting bricks, chipping mortar, aligning units, or removing damaged bricks, the bricklayer’s hammer stands as a reliable companion for a wide range of applications, making it an essential tool on any construction site. Its flexibility and efficiency contribute significantly to achieving structurally sound, visually appealing, and professionally finished brickwork and masonry projects.
Step-By-Step Guide on How to Use a Bricklayer’s Hammer Effectively and Efficiently
A bricklayer’s hammer is a versatile and essential tool for various tasks in bricklaying and masonry work. Follow this step-by-step guide to learn how to use a bricklayer’s hammer effectively:
Step 1: Familiarize Yourself with the Hammer Before using the bricklayer’s hammer, take a moment to familiarize yourself with its components. The hammer consists of a flat striking face on one side and a chisel edge on the other. The striking face is used for hammering and setting bricks, while the chisel edge is for cutting and shaping bricks or removing mortar.
Step 2: Wear Safety Gear Put on appropriate safety gear, including safety glasses and work gloves, to protect your eyes and hands during work.
Step 3: Prepare the Work Area Ensure the work area is clean and free from debris. Set up the necessary bricks, mortar, and other tools within easy reach.
Step 4: Spread Mortar Using a trowel, spread a layer of mortar on the surface where you’ll be laying the bricks. Ensure the mortar bed is even and of the right thickness.
Step 5: Lay the First Brick Pick up the first brick with your non-dominant hand and place it gently onto the mortar bed. Use your dominant hand to hold the bricklayer’s hammer.
Step 6: Align and Level the Brick Using the hammer’s striking face, gently tap the top of the brick to adjust its alignment and ensure it’s level. You can also use the hammer’s side to tap the brick sideways to make fine adjustments.
Step 7: Check for Plumb Hold a level vertically against the side of the brick to ensure it’s plumb (perfectly straight up and down). Make any necessary adjustments.
Step 8: Secure the Brick Once the brick is correctly aligned and plumb, use the striking face of the hammer to strike the brick firmly. This action ensures the brick is securely set in the mortar bed.
Step 9: Remove Excess Mortar Use the chisel edge of the hammer to carefully scrape off any excess mortar that may have squeezed out from the joints.
Step 10: Continue Laying Bricks Repeat steps 5 to 9 for the next bricks in the course. Use the bricklayer’s hammer to maintain proper alignment, levelness, and plumbness as you lay each brick.
Step 11: Cut or Shape Bricks If you encounter areas where a brick needs to be cut or shaped, use the chisel edge of the hammer to make precise cuts or adjustments.
Step 12: Check Alignment Periodically Throughout the bricklaying process, periodically check the alignment, levelness, and plumbness of the bricks to ensure a neat and professional finish.
Step 13: Clean the Hammer After completing the bricklaying work, clean the bricklayer’s hammer by removing any mortar or debris to keep it in good condition for future use.
By following these steps, you can effectively use a bricklayer’s hammer to lay bricks with precision and achieve high-quality masonry work in your construction projects.
Frequently Asked Questions
What do masons use to clean brick?
Masons use various tools and techniques to clean brick surfaces, depending on the level of dirt, staining, or mortar residue. Here are some common methods and tools employed by masons to clean bricks:
- Wire Brush: A wire brush is a standard tool used for light cleaning of brick surfaces. Masons use wire brushes to remove loose dirt, dust, and minor stains from the brickwork. It’s an effective method for routine maintenance and touch-ups.
- Pressure Washer: For more significant cleaning tasks, masons often utilize a pressure washer. A pressure washer uses high-pressure water to dislodge and remove stubborn dirt, grime, algae, and other contaminants from the brick surface. It’s particularly useful for cleaning larger areas or heavily soiled bricks.
- Chemical Cleaners: Masons sometimes use chemical cleaners to tackle tough stains, efflorescence (white salt deposits), or deeply ingrained dirt. Acid-based or alkaline cleaners can be used, but they require careful handling and protective gear. Always follow the manufacturer’s instructions when using chemical cleaners.
- Tuckpointing Trowel: A tuckpointing trowel can be handy for cleaning out the joints between bricks. Masons use this tool to scrape out old or damaged mortar during repointing (replacing deteriorating mortar with fresh mortar) and simultaneously clean the brick joints.
- Muriatic Acid: In some instances, masons may use a diluted solution of muriatic acid to clean tough stains or efflorescence from bricks. However, this method requires caution, as muriatic acid can be hazardous and may cause damage if not used properly. Protective gear, careful application, and thorough rinsing are essential.
- Sandblasting: For heavy-duty cleaning and restoration projects, sandblasting may be used. This method involves blasting fine sand or other abrasive materials at high speed onto the brick surface to remove tough stains, paint, or coatings. Sandblasting requires expertise to avoid damaging the bricks, so it’s typically carried out by experienced professionals.
- Sponges and Buckets: When cleaning brick surfaces with chemical cleaners, wire brushes, or muriatic acid, masons often use sponges and buckets to apply the cleaning solutions and rinse the bricks after cleaning.
It’s important to note that the method and tools used for cleaning brick should be chosen based on the type of stain or dirt present, the condition of the brickwork, and the desired outcome. Additionally, safety precautions and proper protective gear are crucial when using chemical cleaners or working with abrasive methods. When in doubt or when dealing with delicate historic bricks, it’s best to consult with professional masons or restoration experts to ensure the appropriate cleaning approach is chosen for optimal results without damaging the brick surfaces.
How do you remove hardened excess mortar from bricks?
Removing hardened excess mortar from bricks can be a challenging task, but with the right tools and techniques, it can be done effectively. Here’s a step-by-step guide on how to remove hardened excess mortar from bricks:
Tools and Materials Needed:
- Cold chisel or brick chisel
- Hammer
- Wire brush
- Safety goggles
- Dust mask
- Work gloves
Step-by-Step Guide:
- Safety First: Before starting the removal process, put on safety goggles, a dust mask, and work gloves to protect your eyes, respiratory system, and hands from flying debris and dust.
- Assess the Mortar: Examine the excess mortar to determine its hardness and thickness. If the mortar is soft or crumbly, you may be able to scrape it off with a wire brush. However, if the mortar has fully cured and hardened, you’ll need to use a more aggressive approach.
- Scrape Off Soft Mortar: For soft or partially cured mortar, gently scrape it off using a wire brush. Work in a circular motion to loosen the mortar from the brick surface. Be cautious not to damage the brick while doing this.
- Chisel Away Hardened Mortar: For fully cured and hardened excess mortar, use a cold chisel or brick chisel along with a hammer to chisel away the mortar. Position the chisel at a shallow angle against the mortar joint, and then tap the chisel with the hammer. Start with light taps to prevent damage to the brick and gradually increase the force until the mortar begins to break away.
- Work in Sections: Work on small sections of the brick at a time, rather than attempting to remove all the excess mortar in one go. This approach allows for better control and reduces the risk of damaging the brickwork.
- Use Careful, Controlled Force: Be patient and apply controlled force while chiseling. Avoid striking the brick directly with the hammer, as this may cause chips or cracks. The goal is to remove the excess mortar without causing damage to the underlying brick.
- Clean and Brush: Periodically clean the area with a wire brush to remove loosened mortar particles. This will also help you see the progress and identify any stubborn spots that require more attention.
- Rinse the Bricks: After removing the excess mortar, rinse the bricks with water to wash away any remaining debris and dust.
- Inspect and Repair: Inspect the cleaned bricks to ensure all excess mortar has been removed. If any spots remain, repeat the chiseling process until the bricks are clean and smooth.
- Final Clean-Up: Once all the excess mortar is removed, clean the surrounding area and dispose of the debris properly.
Why do masons tool mortar joints?
Masons tool mortar joints for several important reasons. Tooling mortar joints is a technique used to finish and shape the joints between bricks or other masonry units after they have been laid. This process involves using specialized tools to create a neat and uniform appearance for the joints. Here are the main reasons why masons tool mortar joints:
- Enhanced Aesthetics: Tooling mortar joints improves the overall appearance of the brickwork or masonry. Neatly tooled joints create clean lines and a more polished finish, enhancing the visual appeal of the structure. Well-crafted joints contribute to a professional and attractive look for the finished construction.
- Structural Integrity: Properly tooled joints help ensure the structural integrity of the masonry. By compacting and shaping the mortar, masons create stronger and more stable joints. This prevents moisture penetration and potential deterioration of the masonry over time.
- Weather Resistance: Tooling mortar joints helps improve the weather resistance of the brickwork. Well-tooled joints create a concave profile, directing water away from the face of the brick and reducing the risk of water infiltration. This protects the bricks from water damage and prolongs their lifespan.
- Consistent Joint Width: Tooling ensures that the joints between the bricks have a uniform width throughout the structure. This uniformity contributes to the overall symmetry and balance of the masonry, resulting in a more visually appealing and professional finish.
- Hidden Imperfections: Masons may use tooling to conceal minor imperfections or irregularities in the bricks or mortar. The tooling process can help smooth out uneven surfaces and create a more even and cohesive appearance for the brickwork.
- Stability and Bonding: Properly tooled joints facilitate better bonding between adjacent bricks and enhance the stability of the brickwork. The compacted mortar in the joints provides increased cohesion and adherence to the bricks, ensuring a durable and robust construction.
- Preventing Water Trapping: By creating a concave profile, tooling helps prevent water from pooling or being trapped in the joints. This reduces the risk of freeze-thaw damage and efflorescence, which can occur when salts from the mortar are deposited on the brick surface.
- Historical Restoration: In historic restoration projects, masons use tooling to replicate the original joint profiles, maintaining the authenticity and historical character of the building.
Overall, tooling mortar joints is a skillful and essential practice in masonry work. By paying attention to joint detailing and finishing, masons ensure the longevity, strength, and appearance of the brickwork, resulting in a high-quality and aesthetically pleasing finished product.
editor's pick
news via inbox
Stay one step ahead with exclusive tips, guides, and offers delivered directly to your inbox.
Sign up for our newsletter and elevate your home improvement game today!