Best Band Clamps for Woodworking: Guide and Reviews
Band clamps are indispensable tools in the woodworking world, providing reliable and versatile clamping solutions for various projects. In this article, we will explore the five best band clamps available on Amazon, their applications, how to use them effectively, and the pros and cons of each.
Our Top Picks for the Best Band Clamps for Woodworking
Bessey VAS-23+2K Variable Angle Strap Clamp

![]()
The Bessey VAS-23+2K Variable Angle Strap Clamp offers exceptional versatility and adjustability. With its variable angle feature, it is ideal for irregular-shaped workpieces, frames, and cabinets. The 23-foot polyester strap provides ample length for larger projects. The ratchet mechanism ensures secure and even clamping pressure. However, the large size of the clamp may limit its maneuverability in tight spaces.
Pros:
- Versatile and adjustable for irregular-shaped workpieces.
- Long 23-foot polyester strap accommodates larger projects.
- Ratchet mechanism provides secure and even clamping pressure.
Cons:
- Large size may limit maneuverability in tight spaces.
POWERTEC 71017 Band Clamp with Quick-Release Levers

![]()
The POWERTEC 71017 Band Clamp is a reliable and easy-to-use option for woodworking projects. It features quick-release levers that allow for quick adjustments and easy removal. The nylon band provides flexibility and durability. This clamp is suitable for square, round, and irregular-shaped objects. However, the limited clamping pressure may not be sufficient for heavy-duty tasks.
Pros:
- Easy-to-use with quick-release levers for adjustments and removal.
- Suitable for square, round, and irregular-shaped objects.
- Flexible and durable nylon band.
Cons:
- Limited clamping pressure may not be sufficient for heavy-duty tasks.
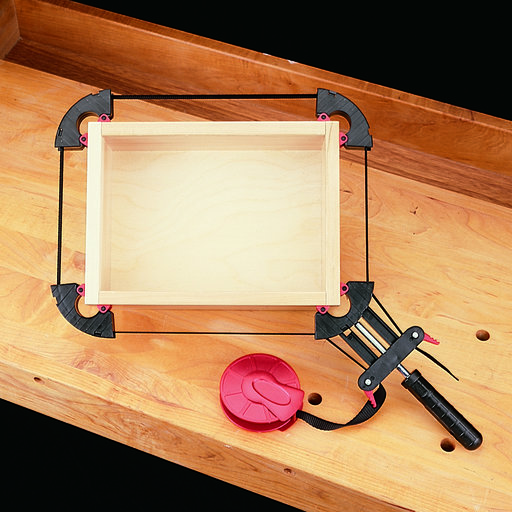
HORUSDY Band Clamp

![]()
The HORUSDY Band Clamp is a versatile band clamp for smaller projects and can handle square, round, or irregular shaped work pieces. It is designed for assembling picture frames, drawers, frames, or other articles of various sizes and configurations. Tension is maintained by means of a handle which tightens the 4-meter-long woven canvas strap linked to the tensioning unit.
Pros:
- Great value.
- Can be used for odd shaped items supporting a host of different projects.
Cons:
- Smaller band; may not be suitable for larger projects.
SEDY Band Clamp, Frame Clamp Quick Release Strap Clamp For Woodworking, Belt Clamp Strap Clamp

![]()
The SEDY Band Clamp is another value pick and an alternative to the HORUSDY band clamp above. Ideal for small projects with lots of versatility, the SEDY Band Clamp can handle irregular work pieces including boxes, picture frames, barrels and more. A drawback would be its 4-meter-long strap and its lack of strength for larger pieces.
Pros:
- Cheapest option.
- Suitable for a wide range of woodworking tasks.
Cons:
- Features a 4-meter-long trap.
- Not as strong as other options.
Pony Jorgensen Adjustable Clamp Pony 1225

![]()
The Pony Jorgensen Adjustable Clamp Pony 1225 is a great middle of the road option. This band clamp can also handle multiple projects. It features metal levers for rapid adjustment and a large comfortable handle for easy use.
Pros:
- Great value.
- Metal levers for rapid adjustment.
- Features a user friendly handle for easy use.
Cons:
- Limited band length
Conclusion
Band clamps are valuable tools for a wide range of woodworking applications, offering secure and versatile clamping solutions. The Bessey VAS-23+2K Variable Angle Strap Clamp, POWERTEC 71017 Band Clamp with Quick-Release Levers, HORUSDY Band Clamp, SEDY Band Clamp, and Pony Jorgensen Adjustable Clamp Pony 1225 are among the top band clamps available on Amazon. Each clamp offers unique features and benefits, catering to different woodworking needs. Consider the specific requirements of your projects, the clamping capacity needed, and the type of workpiece to determine the best band clamp for your woodworking tasks.
What Should You Look For in a Band Clamp?
When looking for a band clamp, there are several key factors to consider. Here are some important things to look for:
- Material: Band clamps are typically made of stainless steel, but you should ensure that the material is durable, corrosion-resistant, and capable of withstanding the intended application. Stainless steel is commonly used due to its strength and resistance to rust.
- Band Width and Thickness: The width and thickness of the band are important considerations as they determine the strength and stability of the clamp. A wider and thicker band generally provides more secure and even pressure distribution.
- Adjustability: Look for a band clamp that offers adjustability in terms of size and tension. This allows you to fit the clamp around different objects of various diameters and apply the desired amount of pressure.
- Closure Mechanism: Consider the type of closure mechanism the band clamp utilizes. Some common options include screw-driven, ratchet-driven, or quick-release mechanisms. Choose a closure mechanism that is easy to use, reliable, and provides secure fastening.
- Load Capacity: Determine the load capacity or maximum tightening force of the band clamp. Ensure that it is suitable for the intended application and can handle the required pressure without bending or deforming.
- Protective Coating: A band clamp with a protective coating, such as a vinyl or silicone layer, can help prevent damage to the clamped objects and provide additional corrosion resistance.
- Ease of Use: Look for a band clamp that is easy to install, tighten, and release. Consider features such as ergonomic handles or quick-release mechanisms that facilitate hassle-free operation.
- Brand and Quality: Choose a reputable brand known for producing high-quality clamps. Reading customer reviews and checking the product’s ratings can help you assess the overall quality and reliability of the band clamp.
- Application-specific Features: Depending on your specific requirements, you might need a band clamp with additional features. For example, if you’re working with delicate or soft materials, a band clamp with a padded lining might be preferable to avoid surface damage.
By considering these factors, you can find a band clamp that suits your needs, provides secure and adjustable clamping, and offers durability for long-lasting use.
Exploring the Versatile Applications of Band Clamps
- Woodworking: In the realm of woodworking, band clamps are frequently employed for gluing large panels, laminating tabletops, and assembling furniture frames. Their adjustable nature allows for accommodating different sizes and shapes of workpieces. Band clamps distribute even pressure along the length, ensuring a strong bond while preventing distortion or damage to delicate surfaces.
- Metalworking: Band clamps are useful in metal fabrication processes, such as securing workpieces during welding, soldering, or brazing. They provide a firm grip and help maintain alignment, enabling accurate and precise joint formation. Band clamps are also valuable in holding metal pipes or tubing together during cutting, drilling, or assembly, ensuring stability and proper alignment.
- Automotive Repairs: Band clamps play a vital role in automotive repairs and maintenance. They are commonly used to secure hoses, pipes, and fittings in automotive cooling systems, exhaust systems, and fuel systems. The adjustable nature of band clamps allows for precise fitting and sealing, preventing leaks and ensuring optimal performance.
- Plumbing: In plumbing applications, band clamps find widespread use for connecting pipes, particularly in situations where traditional threaded connections are impractical or inaccessible. They provide a reliable and adjustable solution for joining pipes with different diameters or when working with unconventional pipe materials. Band clamps can also be used to temporarily secure leaking pipes until permanent repairs can be made.
- HVAC Systems: Heating, ventilation, and air conditioning (HVAC) systems often require band clamps for connecting air ducts and securing flexible ducting. Band clamps provide a tight seal, preventing air leakage and ensuring efficient airflow. Their adjustable nature allows for easy installation and maintenance of HVAC components.
- Home Improvement: Band clamps come in handy for various home improvement projects. They can be used to hold pieces together during furniture repairs, construction of custom shelving, or installation of cabinetry. Band clamps also find application in projects such as fixing broken chair legs, reinforcing joints, or aligning parts during glue-ups.
- Arts and Crafts: Band clamps have their place in arts and crafts projects. They can be utilized for clamping irregularly shaped objects, such as sculptures or models, allowing artists to hold pieces securely while applying adhesives or performing intricate detailing. Band clamps are also useful in woodworking crafts, such as making segmented bowls or gluing small pieces together.
How To Use a Band Clamp for Woodworking
Step 1: Choose the Right Band Clamp
Select a band clamp that suits your woodworking project. Consider factors such as the length and flexibility of the band, the clamping capacity, and any additional features that may be useful for your specific task.
Step 2: Prepare the Workpieces
Ensure that the surfaces to be clamped are clean, dry, and free from any debris. If necessary, use sandpaper or a chisel to smooth rough edges or surfaces. It is also helpful to dry fit the pieces together before clamping to ensure proper alignment.
Step 3: Open the Band Clamp
Loosen the band clamp by rotating the tensioning mechanism or opening the quick-release levers. This will create enough slack to easily wrap the band around the workpieces.
Step 4: Position the Band Clamp
Wrap the band around the workpieces in the desired location for clamping. Position the clamp in a way that evenly distributes pressure across the surface. Ensure that the band is centered and straight along the length of the workpieces.
Step 5: Tighten the Band Clamp
Start tightening the band clamp by either rotating the tensioning mechanism or closing the quick-release levers. Apply even pressure to the band, gradually increasing the tension. Work your way around the clamp, tightening each section in small increments.
Step 6: Check Alignment and Adjust as Needed
While tightening the band clamp, periodically check the alignment and positioning of the workpieces. Make any necessary adjustments by loosening the clamp slightly, repositioning the pieces, and then retightening the band.
Step 7: Secure the Clamp
Once you have achieved the desired clamping pressure and alignment, secure the band clamp in place. Some band clamps have built-in mechanisms to lock the tensioning mechanism or keep the band in place.
Step 8: Wait for the Glue to Dry (If Applicable)
If you are using the band clamp to hold glued pieces together, wait for the glue to dry completely. Follow the manufacturer’s instructions for the recommended drying time before removing the band clamp.
Step 9: Release the Band Clamp
Loosen the tension or release the quick-release levers to release the clamping pressure. Carefully remove the band clamp from the workpieces.
Step 10: Complete the Woodworking Task
With the pieces held securely by the band clamp, proceed with your woodworking task, such as sanding, shaping, or further assembly. The band clamp ensures stability and prevents movement during the process.
Using a band clamp in woodworking provides reliable and even clamping pressure for various projects. Remember to follow the manufacturer’s instructions and guidelines specific to your band clamp model for optimal results and safety.
Frequently Asked Questions
What can I use instead of a band clamp?
If a band clamp is not available or suitable for your specific application, there are several alternatives that can be used depending on the situation. Here are a few alternatives to consider:
- C-Clamps: C-clamps are versatile tools commonly found in workshops. They consist of a fixed jaw in the shape of a “C” and a threaded screw for adjustment. C-clamps can be used to hold objects together, apply pressure during gluing or clamping tasks, and secure workpieces during various projects. For more on C Clamps, see our article here.
- Spring Clamps: Spring clamps, also known as pinch clamps or hand clamps, are compact and easy-to-use clamps with a spring-loaded mechanism. They are ideal for lightweight applications where moderate pressure is needed, such as holding pieces together while the adhesive dries or securing small components during assembly. For more on Spring Clamps, see our article here.
- Bar Clamps: Bar clamps, also called parallel clamps, are long, straight clamps with adjustable jaws. They are well-suited for larger projects and provide even pressure distribution along the length of the workpiece. Bar clamps are commonly used in woodworking, cabinet making, and furniture assembly. See more on Bar Clamps here.
- Pipe Clamps: Pipe clamps consist of a length of pipe with a threaded mechanism that allows for adjustment. They are particularly useful for clamping irregularly shaped objects or workpieces with large diameters. Pipe clamps are commonly used in woodworking, metalworking, and plumbing applications. For more on Pipe Clamps, see our article here.
- Rope or Strap Clamps: In situations where a flexible and adjustable clamping method is required, ropes or straps can be utilized. By wrapping the rope or strap tightly around the workpieces and securing it with knots or buckles, you can create a makeshift clamp. This method is often used for securing irregularly shaped objects or large assemblies.
- Rubber Bands or Bungee Cords: For lightweight and temporary applications, rubber bands or bungee cords can serve as makeshift clamps. They can be used to hold objects together temporarily, provide light pressure, or secure items in place.
- Weighted Objects: In some cases, placing weighted objects on top of the workpiece can be an alternative method of applying pressure. This approach works well for gluing flat surfaces or veneers, where the weight helps ensure proper adhesion.
It’s important to note that while these alternatives can be useful in various situations, they may not provide the same level of adjustability, even pressure distribution, or stability as a dedicated band clamp. Therefore, the choice of alternative will depend on the specific requirements and limitations of your project.
Can I use a ratchet strap as a clamp?
Yes, a ratchet strap can be used as a clamp in certain situations. A ratchet strap consists of a webbing or strap with a ratchet mechanism that allows for tight and secure tensioning. While it is primarily designed for securing cargo during transportation, it can also be repurposed as a clamp in various applications.
Here are some considerations and tips for using a ratchet strap as a clamp:
- Material: Ensure that the ratchet strap is made of a strong and durable material, such as nylon or polyester, that can withstand the pressure and tension required for the clamping task.
- Ratchet Mechanism: Familiarize yourself with the operation of the ratchet mechanism. It typically involves pulling the strap through the ratchet to tighten and secure it in place.
- Adjustability: Ratchet straps offer adjustable tensioning, allowing you to apply the desired amount of pressure. This adjustability can be advantageous when clamping objects of varying sizes or shapes.
- Protection: To prevent damage to the surfaces being clamped, consider using padded inserts or placing a protective barrier between the ratchet strap and the workpiece.
- Stability: Depending on the specific application, you may need to ensure the stability of the clamped objects. Additional support or bracing might be necessary to prevent movement or shifting.
- Weight and Load Capacity: Consider the weight and load capacity of the ratchet strap. Ensure that it is suitable for the clamping task and can safely handle the anticipated pressure without risking failure or damage.
It’s important to note that while a ratchet strap can provide significant clamping force, it may not offer the same level of precision or even pressure distribution as a dedicated clamp. Additionally, due to the design and mechanics of a ratchet strap, it may not be suitable for certain delicate or small-scale applications.
Always exercise caution and use your judgment when repurposing tools for applications other than their intended use.
How do you tighten band clamps?
To tighten a band clamp, follow these general steps:
- Position the Band Clamp: Place the band clamp around the objects you wish to secure or join together. Ensure that the band is properly aligned and positioned.
- Engage the Closure Mechanism: Depending on the type of band clamp you have, engage the closure mechanism. This could be a screw-driven mechanism, a ratchet-driven mechanism, or a quick-release mechanism.
- Screw-Driven: If your band clamp has a screw-driven closure mechanism, turn the screw clockwise using a screwdriver or a specialized tool until the desired tension is achieved. Rotate the screw until the band is securely tightened around the objects, ensuring a firm and even grip.
- Ratchet-Driven: For a ratchet-driven band clamp, insert the band into the ratchet mechanism and engage the ratchet. Use the handle or lever to tighten the band, applying incremental tension until the desired level of tightness is achieved. The ratchet mechanism allows for easy adjustment and secure locking in place.
- Quick-Release: Some band clamps feature a quick-release mechanism for effortless tightening and loosening. Follow the specific instructions provided with the clamp to engage or disengage the quick-release mechanism.
- Check the Tension: Once the band clamp is tightened, visually inspect the clamped objects and ensure that the tension is adequate for your application. The band should be snugly secured, providing the desired pressure without being overly tightened, which could cause deformation or damage to the objects.
- Lock or Secure the Closure Mechanism: Depending on the closure mechanism, lock or secure it in place to prevent accidental loosening during use. This step may involve tightening a lock nut, securing a latch, or engaging a locking mechanism specific to the type of band clamp you are using.
Remember to always refer to the manufacturer’s instructions for the specific band clamp you have, as different clamps may have variations in their tightening mechanisms. Additionally, exercise caution to avoid over-tightening, as it could lead to damage or distortion of the objects being clamped.
editor's pick
news via inbox
Stay one step ahead with exclusive tips, guides, and offers delivered directly to your inbox.
Sign up for our newsletter and elevate your home improvement game today!