Mastering the Use of the Notched Trowel: A Comprehensive Guide
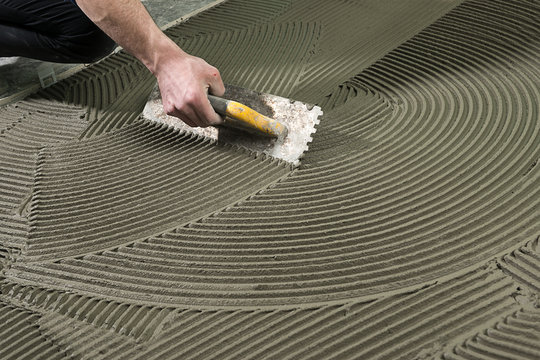
Notched trowels, those unassuming yet indispensable tools found in the arsenal of every tiler, hold the key to precise and efficient tile installations. Their distinctive notches create ridges in adhesive or mortar, ensuring proper coverage and adhesion of tiles to various surfaces. Beyond their primary function, notched trowels find a myriad of applications in the world of construction and craftsmanship. Let’s explore the versatility of these unheralded heroes and the different applications they excel in. We will also provide a step-by-step guide on how to use notched trowels effectively and efficiently giving you the confidence to tackle any project that comes your way.
If you need help finding the best notched trowel for any of the versatile applications listed below, see our product review article here.
Exploring the Various Applications of the Notched Trowel
- Tile Installation: The most common and fundamental application of notched trowels lies in tile installation. They play a crucial role in spreading adhesive or mortar on the substrate before placing the tiles. The choice of trowel size and notch shape is crucial to achieving proper coverage and alignment. V-notch trowels work well with smaller tiles and irregular surfaces, while square-notch trowels are ideal for larger tiles and ensuring uniform thickness.
- Flooring Projects: Apart from tile installation, notched trowels also come into play when laying various flooring materials. Whether it’s installing vinyl sheets, carpet glue, or engineered wood flooring, notched trowels help ensure consistent adhesive distribution and proper bonding to the subfloor.
- Wall Coverings: Notched trowels extend their versatility to wall coverings as well. They are instrumental in adhering wallpaper with adhesive, spreading adhesive for wall tiles, or applying mastic for decorative wall panels. The precision and control offered by notched trowels contribute to seamless and durable wall applications.
- Plastering and Stucco: Notched trowels are valued tools for plastering and stucco applications. They help spread and manipulate the plaster or stucco mixture on walls, ceilings, and other surfaces, creating a smooth and even finish. The notch size and trowel flexibility impact the texture and thickness of the final plaster or stucco coat.
- Adhesive Application: Beyond the realm of construction, notched trowels find utility in various adhesive applications. They are employed in DIY crafts, such as scrapbooking and paper crafts, where adhesive needs to be evenly spread. Notched trowels are also used in woodworking to distribute wood glue for strong and seamless joints.
- Caulking and Grouting: Notched trowels, especially those with smaller notches, serve as handy tools for caulking and grouting projects. They aid in spreading grout or caulk into tile joints or crevices, ensuring a neat and tidy finish.
- Sculpting and Artistry: In the hands of skilled artists and sculptors, notched trowels become tools of expression. These trowels can be used to create unique textures and patterns on sculpted surfaces or artwork, allowing artists to unleash their creativity.
- Gardening and Landscaping: Notched trowels with wider notches find applications in gardening and landscaping. They are used to spread soil, mulch, or mortar for setting stones or bricks in garden paths or landscape features.
The unassuming notched trowel may have started its journey as a tool for tile installations, but its versatility and usefulness extend far beyond that singular application. From flooring projects to plastering, adhesive applications to artistry, notched trowels have proven to be indispensable tools across various industries and endeavors. As technology and design continue to evolve, these simple yet effective tools will likely remain an essential part of any craftsman’s toolkit. So, the next time you pick up a notched trowel, remember its versatility and the countless applications it can enhance and perfect.
Step-By-Step Guide on How to Use a Notched Trowel Effectively and Efficiently
Using a notched trowel effectively is crucial for achieving a successful tile installation or any other application that requires adhesive or mortar distribution. Follow these step-by-step instructions to make the most of your notched trowel:
Step 1: Choose the Right Notched Trowel: Select a notched trowel that is appropriate for the size and type of tiles you are working with, as well as the adhesive or mortar being used. Consider the manufacturer’s recommendations for notch size and shape based on your specific project.
Step 2: Prepare the Surface: Ensure that the surface to which you will be applying the tiles or other materials is clean, dry, and free of dust, debris, and any other contaminants. A smooth and level surface will contribute to a more successful installation.
Step 3: Mix the Adhesive or Mortar: Prepare the adhesive or mortar according to the manufacturer’s instructions. Use a mixing paddle and a bucket to create a smooth and consistent mixture. Follow the recommended water-to-powder ratio for the best results.
Step 4: Load the Trowel: Using a margin trowel or a similar tool, scoop an appropriate amount of adhesive or mortar onto the flat surface of the notched trowel.
Step 5: Hold the Trowel Correctly: Hold the notched trowel at a slight angle to the surface, typically around 45 degrees. This angle allows the notches to make proper contact with the substrate, creating uniform ridges.
Step 6: Spread the Adhesive or Mortar: Begin spreading the adhesive or mortar onto the surface in even, sweeping motions. Apply enough pressure to ensure the adhesive penetrates any imperfections in the substrate. Work in small sections to prevent the adhesive from drying out before tiles can be placed.
Step 7: Create Notched Ridges: With the trowel at the proper angle, comb through the adhesive or mortar using the notched edge. The notches will create ridges that help distribute the adhesive evenly and ensure proper tile adhesion. For best results, work in one direction and avoid back-and-forth motion.
Step 8: Check Notch Coverage: Periodically check the notch coverage on the back of a tile as you work. The back of the tile should have full coverage of adhesive or mortar with the notches visible on the surface. Adjust your technique or notch size if necessary to achieve adequate coverage.
Step 9: Place the Tiles: Carefully place each tile onto the freshly notched adhesive, gently pressing and twisting to ensure good contact with the substrate. Use tile spacers to maintain consistent spacing between tiles.
Step 10: Clean and Maintain the Trowel: After use, clean the notched trowel with water and a brush to remove any dried adhesive or mortar. Properly clean and store the trowel to ensure its longevity and continued effectiveness for future projects.
By following this step-by-step guide, you can effectively use a notched trowel to achieve a professional and durable tile installation or other applications requiring adhesive or mortar distribution. Proper technique and attention to detail will result in a successful and aesthetically pleasing outcome for your project.
Frequently Asked Questions
What is a V-notch trowel best used for?
A V-notch trowel is best used for tile installations, particularly when working with smaller and medium-sized tiles. The distinctive V-shaped notches on the trowel create ridges in the adhesive or mortar, ensuring proper coverage and adhesion of the tiles to the substrate. Here are the specific applications where a V-notch trowel excels:
- Ceramic and Porcelain Tiles: V-notch trowels are commonly used for installing standard ceramic and porcelain tiles, especially those with dimensions up to 6 inches. The V-shaped notches help distribute the adhesive evenly on the back of the tiles, ensuring secure adhesion to the substrate.
- Wall Tiles: When working with wall tiles, which are usually smaller and lighter than floor tiles, a V-notch trowel is an excellent choice. It provides sufficient adhesive coverage and helps prevent tiles from slipping or sliding down the wall during installation.
- Mosaic Tiles: V-notch trowels are ideal for installing mosaic tiles, which come in small individual pieces mounted on mesh sheets. The notches ensure that each individual tile is adequately adhered to the surface while maintaining proper alignment.
- Backsplashes and Decorative Accents: For projects involving backsplashes or decorative tile accents, a V-notch trowel offers precise adhesive distribution. It allows for controlled application of adhesive, ensuring that intricate tile patterns and designs remain securely in place.
- Irregular or Uneven Surfaces: V-notch trowels can accommodate minor irregularities or unevenness on the substrate surface. The V-shaped notches allow the adhesive to flow and fill in small gaps, resulting in better tile-to-substrate contact.
- DIY Projects: V-notch trowels are often used by DIY enthusiasts for small to medium-sized tiling projects. They are easy to use and provide consistent results, making them an accessible choice for homeowners tackling tile installations themselves.
- Budget-Friendly Projects: Since V-notch trowels are generally less expensive than trowels with larger notches, they are a budget-friendly option for tile installations.
It’s important to note that while V-notch trowels are versatile and widely used, their suitability depends on the specific tile and adhesive being used. Always refer to the manufacturer’s recommendations for the appropriate trowel size and shape for your particular project.
In summary, a V-notch trowel is best used for installing smaller and medium-sized tiles, including ceramic, porcelain, and mosaic tiles, on both walls and floors. Its ability to distribute adhesive evenly and accommodate minor irregularities makes it a reliable choice for various tile installations.
What is the best notched trowel to use?
The best notched trowel to use depends on the specific requirements of your tiling project. Different trowels are designed for various tile sizes, types, and adhesive or mortar applications. Here are some factors to consider when choosing the best notched trowel for your needs:
- Tile Size: Consider the size of the tiles you are working with. Smaller tiles, such as mosaic tiles or those up to 6 inches, may require a trowel with smaller notches like a 1/4-inch V-notch trowel. For larger tiles or natural stone tiles, a trowel with larger notches, such as a 1/2-inch square-notch trowel, might be more suitable.
- Tile Type: Different tile materials, such as ceramic, porcelain, glass, or natural stone, may have specific recommendations for the type of trowel to use. Some delicate tiles may require a trowel with notches that are less likely to cause damage during installation.
- Adhesive or Mortar Type: The type of adhesive or mortar you are using also affects the choice of notched trowel. Some adhesives have specific requirements for the notch size and shape to achieve proper bonding.
- Substrate Condition: If the surface you are tiling on has minor irregularities or is slightly uneven, a trowel with V-shaped notches may be more suitable, as it can help level out imperfections.
- Budget: Consider your budget and choose a trowel that fits within your price range. While high-quality trowels may come with a higher price tag, they often offer better durability and performance.
- Comfort and Grip: A trowel with an ergonomic handle and a comfortable grip can reduce hand fatigue during extended use, making your tiling job more comfortable and efficient.
- Project Scale: For small DIY projects, a budget-friendly notched trowel with the right size may be sufficient. For larger or professional projects, investing in a high-quality, durable trowel may be a wise choice.
- Brand and Quality: Opt for trowels from reputable brands known for their quality construction and reliability. Trusted brands are more likely to offer trowels made from high-quality materials.
The best notched trowel to use will ultimately depend on the specific requirements of your tiling project. It is essential to consider factors such as tile size, tile type, adhesive or mortar type, substrate condition, budget, and comfort during use. Be sure to follow the manufacturer’s recommendations for the trowel size and shape that best suits your tile and adhesive combination to ensure a successful and professional-looking tile installation.
What is the difference between V notch and U notch trowels?
The main difference between V-notch and U-notch trowels lies in the shape of their notches. Both trowels are used for tile installations and other applications that require adhesive or mortar distribution, but their notch shapes produce different patterns and coverage. Here’s a comparison of V-notch and U-notch trowels:
V-Notch Trowel:
- Notch Shape: V-notch trowels have V-shaped notches, which resemble a letter “V” when viewed from the side. The notches are deeper in the center and gradually taper towards the edges.
- Adhesive Distribution: The V-shaped notches create ridges in the adhesive or mortar, allowing for even distribution of the material when the trowel is combing through the substrate.
- Advantages: V-notch trowels are known for providing excellent adhesive coverage and ensuring secure adhesion of tiles to the substrate. They are commonly used for smaller and medium-sized tiles, including ceramic, porcelain, and mosaic tiles.
- Best Use: V-notch trowels are ideal for projects involving standard-sized tiles, where even adhesive distribution is critical to achieving a strong bond between the tiles and the substrate.
U-Notch Trowel:
- Notch Shape: U-notch trowels have U-shaped notches, resembling a letter “U” when viewed from the side. The notches are more open and have a consistent width along their entire length.
- Adhesive Distribution: U-notch trowels create wider ridges in the adhesive or mortar compared to V-notch trowels. The open notches allow for more adhesive to be applied, which can be advantageous when working with larger or heavier tiles.
- Advantages: U-notch trowels are best suited for larger tiles, natural stone tiles, or tiles with varying thicknesses. They provide better support and prevent tile slippage during installation.
- Best Use: U-notch trowels are commonly used for large-format tiles, where additional adhesive is needed to support the weight and size of the tiles. They are also suitable for tiles with uneven backs or irregular surfaces.
In summary, the main difference between V-notch and U-notch trowels lies in the shape of their notches and the resulting adhesive distribution. V-notch trowels are best used for smaller and medium-sized tiles, providing even adhesive coverage and secure adhesion. On the other hand, U-notch trowels are more suitable for larger tiles, natural stone tiles, or tiles with varying thicknesses, offering better support and preventing slippage. The choice between V-notch and U-notch trowels depends on the specific tile size, type, and application, as well as the substrate condition and adhesive or mortar being used.
editor's pick
news via inbox
Stay one step ahead with exclusive tips, guides, and offers delivered directly to your inbox.
Sign up for our newsletter and elevate your home improvement game today!